
 Posted in
  Tags:
Tags: Replace the Front Sway Bar on an E46 (1999-2005) BMW 3 Series
Works For:
1999, 2000, 2001, 2002, 2003, 2004, 2005 BMW 3 Series Models
BMW 3 Series Includes: 316, 318, 320, 323, 325, 328, 330 and M3 .
Source: M3.MadRussian.net
This job takes about 30-45 minutes of actual work (once you have the car off the ground). If you are not comfortable or competent with working on your suspension, leave it to a professional!
THE INSTALLATION OF SWAY BARS CAN HAVE DRASTIC EFFECTS ON YOUR CAR’S HANDLING CHARACTERISTICS. THE USE OF IMPROPER SWAY BARS, INCORRECT ADJUSTMENT AND/OR INSTALLATION CAN MAKE YOUR VEHICLE’S HANDLING UNPREDICTABLE AND DANGEROUS. ALWAYS FOLLOW MANUFACTURERS’ SET UP AND INSTALLATION INSTRUCTIONS. ALWAYS TEST ANY HANDLING CHANGES IN A SAFE AND CONTROLLED ENVIRONMENT.
Note:
- Your front wheels must be off the ground to change sway bars. See Getting car up on jack stands DIY.
- I assume that your car is already up on a lift or on jack stand.
Step 1: Getting the required items together
This job requires:
- A lift or some other method of getting the front wheels off the ground.
- Socket Wrench
- Torque wrench (recommended)
- 13mm Socket
- 16mm Socket
- 8mm Socket
- 16mm Open Wrench
- A BMW M3 (E46).
- About 30-45 minutes of free time.
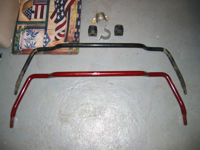
Eibach and OEM Front Sway Bars
Step 2: Removing the plastic under tray
- The plastic tray that needs to come is the front section that starts right at the end of the bumper and goes back down the center of the car directly under the engine.
- The tray is attached via 2 bolts on each side and 3 bolts at the rear (all bolts are 8mm).
- Remove the 7 bolts and pull the tray back and out of the car – try not to drop it on your head.
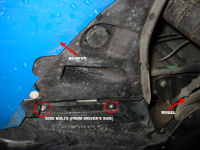
2 Side Retaining Bolts (from driver’s side)
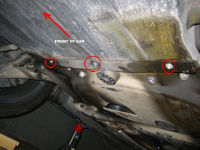
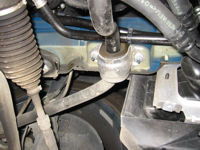
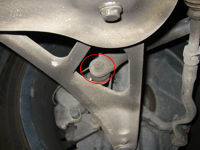
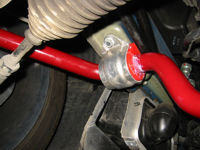
Step 3: Releasing the bushing supports
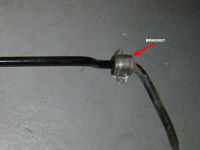
- Once the plastic tray is out you will clearly see the sway bar and the two body attachment points (see image)
- Each attachment point is secured with 2 13mm bolts.
- Remove the 2 bolts from each support to free the sway bar from the body.
Attachment Point Driver’s Side (with details)
Attachment Point Passenger Side
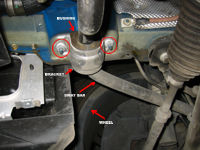
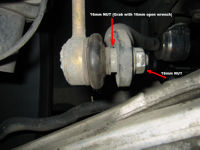
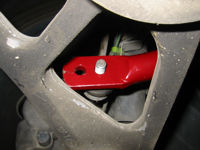
Step 4: Releasing the sway bar ends
- Follow the sway bar to the end.
- The sway is attached via a 16mm bolt.
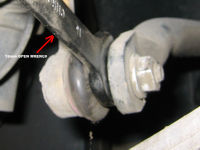
- You have to slip a 16mm open wrench between the end of the sway bar and the control arm support to keep things from spinning and remove the 16mm outside nut to free the end of the sway bar.
- Repeat for the other side
- The sway bar will now be free – make a mental note of how the sway bar is situated to aid in reassembly and carefully work it out of the car
Step 5: Taking the stock brackets off
- Eibach requires that you reuse the metal brackets that attach the sway bar to the body.
- These simply slip off the OEM sway and bushing.
- You do not need to remove the OEM bushing off the OEM sway as they are not reused.
- You’re now done with the OEM sway. Set it aside.
Step 6: Pre-assembling the new sway bar
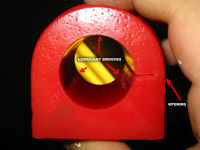
- The 2 new bushings need to be lubricated and attached to the sway bar.
- Some sway bars (Eibach) come with a lubricant – some people recommend using marine grease as an alternative.
- The inside of Eibach bushings have 3 grooves to retain lubricant. Fill the grooves with the lubricant on both bushings.
- Wipe off any lubricant from the outside of the bushing or you will have a hell of a time getting them to slip onto the sway bar.
- The bushings have an opening along the edge – spread at this edge and slip the bushing onto the sway bar at roughly the same location as the bushing on the OEM sway bar you took out (this does not have to be exact).
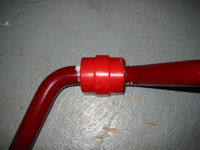
- Finish by placing the metal bracket on to the new bushing.

OEM (black) and Eibach (red) Bushings

Step 7: Installing the new sway bar
- Carefully slide the new sway bar into place.
- Once situated correctly, put a little blue loctite on the 13mm nuts and thread them on part way to secure the 2 body brackets.
- Don’t tighten these down all the way yet – just enough to hold the brackets and sway bar in place as you attach the ends.
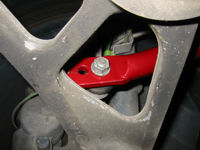
Step 8: Attaching the ends
- At this point you have to decide one the initial setting for your front sway bar – Eibach sways have 3 possible settings – I chose the middle setting (front hole on one side, rear hole on the other – yes, you can do that).
- If you do not understand how selecting different settings will effect the handling of your vehicle – CONSULT A PROFESSIONAL before you kill yourself or others.
- Insert the links through your chosen location at the respective ends of the sway bar.
- Thread on the 16mm nut, hold the link in from twisting with a 16mm open wrench and tighten down the 16mm nut – simply the reverse of disassembly.
- Repeat for the other side
Link Inserted Through End of Sway
Step 9: Finishing Up
- Go back and torque the bracket bolts to 25 ft lbs.
- Recheck the ends to make sure they are tight.
- Reinstall the plastic under tray.
- Eibach strongly recommends that you check all of the bolts after about 50 miles of driving – that is a very good idea.
- Remember that you have now changed the way your car will handle – don’t push it till you are used to its new characteristics.