
 Posted in
  Tags:
Tags: Replace the Transmission Mount on an E46 (1999-2005) BMW 3 Series
Works For:
1999, 2000, 2001, 2002, 2003, 2004, 2005 BMW 3 Series Models
BMW 3 Series Includes: 316, 318, 320, 323, 325, 328, 330 and M3 .
Source: M3.MadRussian.net
This install takes 30 – 45 minutes to do. This is a serious pain in the ass. It is not technically difficult to do but it requires working in very tight spaces and may cause real headaches.
Click on the images for larger views.
Step 1: Getting the required items together
This install requires:
- A lift or hydraulic jack and jack stands (see how to jack up the car here)
- If using a lift you will need a transmission support as well.
- Socket wrench
- 8mm socket
- 10mm socket
- 13mm socket (deep socket will be required for some parts of this install)
- 13mm box wrench (open wrench).
- Torque wrench (with a range up to 15 lb or more)
- A BMW M3 (E46).
- 30 – 45 minutes of free time.

Step 2: Getting Started Under the Car
- Two of the plastic shields have to be removed in order to gain access to the transmission.
- Work from the driver’s side of the car and remove the two shields pictured here –>
- The shields are have a series of 8mm screws and bolts as well as being interlocked with tabs.
- Remove the smaller shield that is closest to the side of the car first.
- Make a mental note at to how these are installed – this will make reinstalling them MUCH easier.
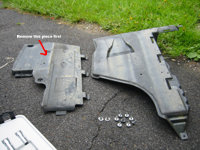
Plastic Under Pan Pieces Removed
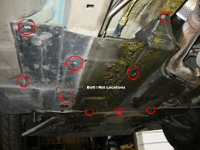
Step 3: Removing Part of the Heat Shield
- From the passenger side of the car locate the section of the heat shield that is covering up the passenger side of the transmission mount.
- Look at the images and remove the 3 bolts on the section covering up the tranny brace and 1 bolt from the heat shield covering up the rear edge of the one you are removing (see first image).
- Carefully work the section of the heat shield out and set it aside.


Step 4: Supporting the Transmission
- Use a jack or a transmission support to support the transmission
- Just put enough pressure on the transmission to gain solid support – don’t jack it up.


Step 5: Loosen the Transmission Brace
- Once you have the transmission solidly supported you will need to remove the bolts (13mm) from the transmission brace (big silver aluminum piece that bridges the tunnel).
- Don’t try to remove the mounts themselves yet, just remove the 4 bolts used to retain the brace in place. (see images)
- The brace will stay in place after the bolts are removed. You will have to use an open wrench to remove the rear passenger side bolt.
- Some have said that you can do this DIY without removing the tranny brace – They must have the smallest and strongest hands on earth to do so. Removing the brace likely takes a ton of time off this DIY and quite a bit of profanity as well.


Step 6: Loosen the Tops of the Transmission Mounts
- This is the fun part and unfortunately my pictures that show the mounts in place did not turn out very well. Thus the image in this step shows the bracket already out of the car with the mounts still in place – use it as a reference for locating the nuts on top of the mounts while still in the car.
- Use your 13mm box wrench to loosen the nuts on top of both transmission mounts.
- Remove the nuts.
- This is a royal pain in the ass and it takes patience to do it right – be careful not to strip the nuts.

Step 7: Remove the Bracket and Mounts from the Car
- Once the nuts on top of the mounts are off pull the bracket back toward the rear of the car to brake it loose.
- Once it slides back, you can remove the center rubber support (see image, again already out of the car).
- After the center piece is removed, carefully work the bracket with the mounts attached out of the car.

Step 8: Remove the Mounts from the Bracket
- Once you have the transmission bracket out of the car remove the nuts securing the old transmission mounts.
- Pull the OEM mounts off the brace and set aside.


Step 9: Installing the New Mounts on the Bracket
- There is a small notch on one end of the RE transmission mounts. This end goes toward the bracket (you can see the little raised section on the bracket that it fits).
- Torque the nut to 15 ft lbs.
- Repeat for the second mount.


Step 10: Reinstalling the Bracket
- Time to get back under the car (easier from the driver’s side).
- Note the slots on the transmission case that the tops of the transmission mounts slide into (see image).
- Work the bracket back into place – this take a bit of patience.
- Once the bracket is in place, reinstall the center rubber section (this goes on top of the slots in the tranny case and slides on to the exposed ends of the tranny mount bolts).
- Thread the nuts on the tops of the tranny mounts. Do not tighten them down yet.
- Push the bracket as far toward the front of the car as it will go without undue force.
- Reinstall the bracket bolts and torque them to 15 ft lbs.

One of the Slots on Transmission Case
Step 11: Tightening the Tops
- Get your box wrench out and reverse the steps you took to remove the upper nuts from the tranny mounts.
- Take your time and snug them down as much as you can – the factory torque for these is 15 ft. lbs. though I have no idea how you get a torque wrench in there.
Step 12: Replace the Heat Shield
- Reverse the order in which you removed the shield.
- Make sure you get the ends which over lap with other shields under those.
- Replace the 3 nuts on this heat shield and the one bolt on the heat shield you loosened.
Step 13: Replace the Plastic Shields
- Reverse the order in which you removed the shields.
- The shields have interlocking tabs which can make things a pain when putting them back on.
- Take your time and then snug up the screws/bolts that hold the shields in place and you’re done.