
 Posted in
  Tags:
Tags: Flush the Radiator on a First Generation (1991-1994) Ford Explorer
Works For:
1991, 1992, 1993, 1994 Ford Explorer Models
Source: ExplorerForum
Ok, so your truck is overheating. You think the radiator might be clogged. You have more time then you do money, and a flush is in the budget but not a new radiator. Well, you’ve come the the right place!
** Disclaimer: this worked for me, it might not work for you. As always working on a vehicle, or even being around one can be dangerous. Lots of things can go boom, and they are heavy, you don’t want one on top of you. Use these steps at our own risk. The author is not responsible for death, harm either physical or mental, or bloody knuckles.**
So first of all let me tell you how I came to use this method. I bought my truck not too long ago. When test driving it I didn’t happen to drive it long enough (and it was a cool evening), so I didn’t realize it had cooling issues. But after buying it I discovered my oversight on the 40 mile freeway trip home. Back then it would around run A/L in NORMAL, or even beyond L on occasion. Basically if it was hot out or if I had to take the freeway, then it would run very hot. And part of thistrucks job was supposed to be a 200 mile freeway trip 2x a a month. So I had to do something, with no spare cash. So, I took the steps below and am now able to drive 75 MPH, with the AC on, uphill, and have no overheating issues what-so-ever. Runs on O, sometimes between O/R. So I just thought I’d share, it was cheap, and once I got it down it was very easy. All you need is time…
So first a test, is your water dirty? Sometimes it can be a little hard to tell with Antifreeze, so if unsure drain your radiator into a bucket and have a look. If it drained REALLY slow(mine now drains out in about 60 seconds with the plug removed), then you are clogged up. Also anything but bright Green (or orange) in the bucket is dirty, you can kinda see the brown in the green if it’s dirty. Now if it seems it has OIL or GAS in it, this thread is not for you. You have much bigger problems and the radiator is the least of your worries right now. But if it’s just dirty (think rusty) then we can get that puppy clean! If your coolant isn’t dirty, look elsewhere for your fix.
First off, what you’ll need:
Time, lots of it free. Also at least 2 weeks you can work on the truck at least 2-3 hours about every 7 days. To do it really right you need a month.
Tools:
Garden Hose
Garden Hose Sprayer
Bucket
Pliers
Hacksaw or something really sharp to cut a rubber hose.
Flat Head Screw Driver
Jewelers Screwdriver or small pocket knife
Ratchet (or wrenches in below sizes)
8mm Socket
10mm Socket
Need to buy:
New Thermostat (might as well while the Radiator is out) 4.99-25.99 depending on what you get.
Prestone Super Radiator Cleaner – 5.99, you need 2 bottles start to finish.
Prestone Radiator Flush Kit – 3.99
Radiator Cap – $5
Total Cost: $20 or so.
Might want to buy:
New Hoses all around, no use cleaning out old hoses, and if you do get the radiator clean the build up on these could clog it back up at a later. You don’t HAVE to do this, I didn’t. Cost is about $50. You need upper/lower Radiator hoses and 2 heater hoses.
So total cost with new hoses: $70, not quite as cheap as not doing the hoses, but if you get a new radiator you would want to get new hoses too anyway, for the same reasons. So up to you and what you would like to do.
Now let’s get too it,
First your going to want to drain the Radiator, the drain plug is on the passenger side of the radiator, in the bottom corner, it just twist out, I also suggest removing the plug once you have it unscrewed, just pull it straight out to remove. If you have small arms you can get to it from the top using the space between the battery and the fan shroud. If not, you can get it from the bottom too. Just don’t later loose it in the engine like I did. Had to buy a new one. Still haven’t found the old one. Drain it out into your bucket and dispose of the Antifreeze accordingly. On mine when it was clogged even with the plug removed it just kinda dribbled out…but now it SHOOTS out if the plug is removed, hits the axle. Or in our case the TTB  So if it’s not badly clogged DON’T remove the plug, antifreeze will go everywhere. If you using water while your working on it like I am it doesn’t matter so remove it, drains faster.
Next your going to want to put the Prestone Back flush kit in. First your going to want to find the heater hose that comes from the TOP of the water pump. (according to Prestone’s directions at least, I don’t know if it matters) Your going to want to find a good place to cut the hose and place the T for the flush connection. This is going to be where you attach the garden hose for the back flush. So it needs to be somewhere easy to get to. I have mine in the heater hose about 8″ back from where it goes into the heater core (see pic below). Cut that hose (with hack saw or something sharp, these are tough hoses so if using something sharp be careful) To save time remember to put the hose clamps on BEFORE you put the T in…. Not that I did that or anything. I do have a T on both hoses, but that was because someone had cut both hoses before I owned the truck and they had used connectors to reconnect them that were too small. The kit was cheaper then a new connector so I have two flush T’s now!
Also remove the hose from the overflow reservoir to the radiator at this point. It’s the small hose that runs from right under the radiator cap to the plastic reservoir that holds the extra coolant just to the drivers side of the radiator. I detach it at the reservoir, your going to want to clean that out too. Catch the Antifreeze if you can, It’ll kill the grass! I then just leave it unhooked until I’m done and it’s time to refill it. If you don’t do that at some point your going to overflow the reservoir and get Antifreeze all over. Once it’s drained you’ll want to clean it out well. You can just keep filling it up and letting it drain out. You’ll see, keep that up until it runs clean.
Now your going to flush the radiator, first hook up the hose to the flush T, remove radiator cap, put in yellow neck thingie to shoot water away from your belts, and make sure you haven’t reinserted the drain plug, we want it out for now. And hit it with the water…. let it run until the water coming from the neck it clear, then start the truck and run if for awhile, revving it every so often, until it again runs clear.
Now comes the first trick I learned. It LOOKS clean, but ISN’T. So what your going to do is stop the water for a few, put the radiator cap BACK on, leave the drain plug out, and hit it with the water again. If the radiator is truly clogged your not going to get much from the drain plug yet, and water is going to be coming out the overflow hose. My kitchen sink (stupid townhouse doesn’t have a outside water faucet) can build up enough pressure to send the water out the overflow, so I’m sure anyones can. What your looking for is that water is indeed coming out the drain hole. If it just a little bit then you are really clogged, when I was about 1/2 done with mine it would shoot out and hit the axle. Now it flows so well it has no pressure there and just kinda shoots out about 8 inches I guess. And nothing comes out of the overflow now, that’s how it SHOULD be once it’s all cleaned.
Now loosen the radiator cap so it releases the pressure (it’ll spray everywhere), you’ll notice not much will come out the drain hole with the cap off, wait a few then re tighten the cap. When I did this I could see brown stuff shoot out for awhile again. I would then just keep tightening it then unscrewing it until brown stuff stopped coming out the drain hole. I would also notice sometimes something would cut off my flow to the drain hole, I would keep this up and finally it would start flowing again. Once it seems no more brown stuff comes out and the flow seems pretty steady just leave the cap on tightened. Keep water flowing out the drain hole until you can put a bucket under there and the water is no longer “rusty” (it wont LOOK that way shooting out, but you’ll see it in the bucket.) Once that has gotten clean keep running the water until when you use the bucket there isn’t anymore pieces of “crap” in the bottom. This can take awhile, go mow the grass or something, then check every so often, you don’t have to just sit and watch.
Now you have a choice, you can put everything back the way it was and use the Prestone Super cleaner now. Or you can go ahead and pull the raidator to do a really GOOD flush. At this point I would think it would all depend on how much time you have left. You’ll need at least an hour to an hour and 1/2. If you don’t have that kinda time right now skip pulling the radiator for now. I didn’t pull it at this point myself, but now I think it might have helped.
Here’s what to do if you decided to pull the radiator now, if you want to do it later skip to the part of using the Super radiator cleaner for now, and come back to this step in a week.
I have a manual tranny, and pulling my radiator takes me about 5 mins now. If you have a manual my instructions will work perfectly. If you have an auto you have to deal with a tranny cooler, I have no idea how to unhook those so maybe someone will be nice enough give me those instructions too and I’ll include them.
First of all remove the tube that goes from the air box to the Throttle body.
This is what I’m talking about and the arrows point to where you need to loosen the screws to remove it. You will also need to remove the tube I circled.
Next remove the Upper and Lower radiator hoses. These are those big hoses on the top passenger side of the radiator and the bottom drivers side. The top one is cake, depending on what type of “clamp” is on bottom it can be a little difficult. Could be a real pain if you have big arms. Once you have the clamps loose just pull the hose off the radiator. No need to mess with the other ends. With those removed and out of the way remove the two 8mm bolts holding the Fan shroud in. Here is a pic with arrows.
Once you have the bolts removed you pick up on the shroud to release the bottom retainers. Push it kinda back outta your way, then remove the two 10mm radiator bolts shown here.
Now you just pull it out. Easy as pie. Clean out all the leaves and crap that will be between the radiator and the AC thingie, and then use your hose sprayer to spray out the radiator really good. I got black stuff out of mine. If you have some kind of cleaner, I’m sure you could spray it on the radiator and spray it out again with the hose to clean it. All I could find was Windex, not gonna cut it. I finally found my 409, but not sure that would have been strong enough anyway. Then find yourself something small, like a jewelers screwdriver or a small pocket knife blade and unbend any bent fins in the radiator.
***Here is where you would replace the thermostat, it’s SUPER easy with the radiator out. I just use a 1/4″ ratchet with a 3″ extension and a 10mm socket. You also need to get the belt off, so you can release the tensioner pulley that’s right in your way of getting the lower passenger side bolt. As a bonus the pulley is easier to get to with the radiator out also. I use my 1/2″ ratchet for that tensioner pulley, once you get the hang of it easy 1 man job. I don’t remember what size socket the pulley takes. If we need a How To on this I can do that also, but I think there are some already.***
Then comes the fun part. For the next 30 mins to an hour spray water in every hole the radiator has, and let the water pour out of every hole (on an auto radiator you will leave anything to do with the tranny cooler alone) . Keep turning the radiator to get different and new angles, also don’t forget the drain hole, spray water up in there too, and have it in the rotation. On mine the drain hole seemed to be where most of the crud was. It IS on the bottom where all the crap settles.
You will do this until the water runs clear. Then once it’s clear hold your hand below the hole the water is running out of and let it run until crap doesn’t come out in your hand. You can’t see it just washing out, but you’ll see your palm fill up with the stuff. You’ll want to do this for every hole and angle. Lastly lay it flat, with the radiator cap on, and all the holes facing up. Then fill it about 1/2 way up, and rock it back and forth letting the water run from one plastic tank on one side to the other. Keep replacing the water until it runs clear also.
Once that’s done replace the radiator in the truck, reattach the hoses, back flush it for a few minutes for good measure.
Now replace the drain plug, pour in the Prestone super radiator cleaner, and fill up with water. Replace the overflow hose at this point also. I suggest just using water until you have all the flushing done, don’t forget to refill the overflow before your done. Straight water is not advisable for a winter flush, but then hopefully you won’t have these issues in the Winter! You also want to do a good BURP! Instructions below!
Run it for a week or so (run it until you get at least 6 hours of driving time with the flush in) then full flush again (remove radiator), same process as above. Give a day or two, flush again (this time no need to remove radiator, just back flush, your getting out the leftovers from the Super flush), then refill with Super Radiator Flush a second time, run it another week. Do full flush 1 last time (pulling radiator and all), then give it a few days, back flush, few days, back flush again, then if you want and problem is solved, drain, back flush, and refill with your choice of coolant.
Mine is now at about 98% I think, What i have left to fix I think really is just replacing hoses and one more good flush. Then I’m calling it quites on the “fix the 16 year old radiator someone ran mud through” game and if it gives me trouble next summer….. I’m getting me a new radiator! LOL
A GOOD BURP:
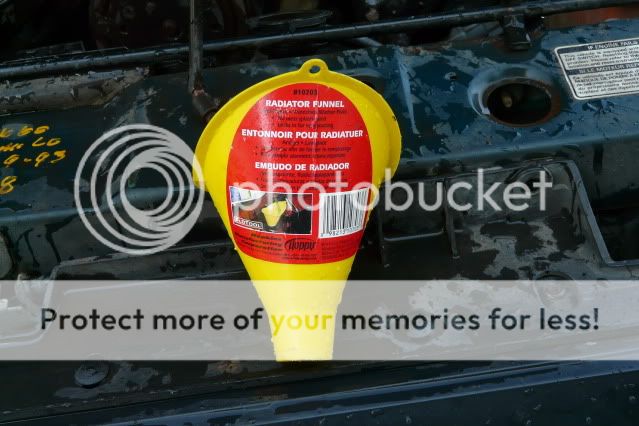
Ok, one thing I’ve noticed about these 4.0L trucks is that the cooling system likes to keep bubbles in the lines, this causes all sorts of crazy gauge issues. So after all my flushes I’ve got a system that seems to work. I’ll get pics up tomorrow about how I do the funnel, but for now I’ll just type it out.
Pretty much you just put a funnel into the neck of the radiator, one that seals the neck (pics below), and fill the system up until the water is about 1/2 way up the funnel, then start the truck. Keep adding water as the bubbles come to the top, if it gets hot fast it will start overflowing the funnel, just let it. I’ve found it’s much worse if you have a stat that has no weep hole. But you want to wait until your sure the stat has opened. Rev the truck by hand or use the pedal if you can’t do it from under the hood. Check the gauge, is it hot enough for the stat to open?? If yes, and your getting no more bubbles in the funnel Rev the truck by hand (if you have removed the plastic guard thingie around the throttle cable linkage you can do this, most people seemed to have removed this, if not then don’t worry about it) while it’s revving the water level will drop, pull the funnel while it’s down and slap on the cap. Process done…
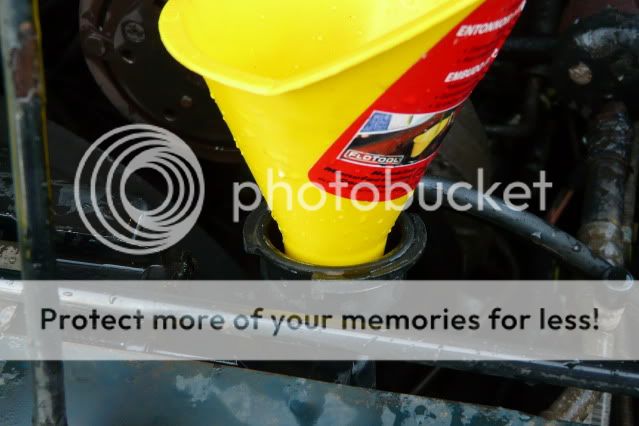

In the end I have since had to replace this radiator due to it developing a leak for some reason once I switched back to Anti-freeze. One of the side tanks inner plastic seal blew out. Two things to note about this, 1st is that the brand new radiator doesn’t cool any better then the “flushed” on I detailed in this post, so that goes to show this process works. 2nd, the yellow funnel I show in the pics…. doesn’t fit in the new neck. So I went and bought a much taller funnel that fit, and it works sorta, I’m still searching for the perfect funnel. But a larger funnel works great with Anti-freeze, as long as you keep the lvl low so you don’t spill all over when your ready to cap it off.
Running distilled water thru the system isn’t a bad idea before adding the coolant again.. Mineral free water is a good thing