Replace the Timing Belt on a 6th Generation (1996-2000) Honda Accord
Works For:
1996, 1997, 1998, 1999, 2000 Honda Civic Models
Source: CivicForums
Timing belt DIY, for 96-00 Civics with 105,000+ normal miles. Pics taken of my 5-speed 97. This DIY will cover the replacement of the following parts:
Power steering belt
Alternator belt
A/C compressor belt
Timing belt
Timing belt tensioner
Water pump
Head gasket
Head cover washers
Spark plug seals
New parts needed. This is for a 1997 DX, parts will likely differ for the EX.
12341-p2f-a00 cylinder head gasket (1)
12342-rye-004 spark plug seals (4)
90442-p2a-000 head cover washers (4) (I recommend you buy 5)
14400-p2f-a01 Timing belt (1)
14520-p2a-305 Timing belt tensioner set (1)
19200-p2a-a01 Water pump (1) (comes with new seal)
38920-p2a-003 Compressor belt (1)
56992-p2a-003 P.S. belt (1)
31110-p2a-004 Alternator belt (1)
Tools needed
If you do not have a professional impact wrench that will remove the pulley bolt, you will need:
1) 18″ 1/2″ breaker bar.
2) Another breaker bar, preferably the 24″ 1/2″ one sold at Autozone.
3) An optional 4 foot pipe that fits over bar nicely. It should have as little play as possible.
4)Honda pulley bolt removal tool. (Must have) Go to Amazon.com and they are sold for 24.99, + free ship if over 25 dollars. (that means buy a good book or something) Search: Alltrade 648796 Honda Crankcase Pulley Removal Tool.
5)An extra jack stand in addition to the two holding the front of the vehicle. This will act as a support for your breaker bar when you remove the pulley bolt.
In addition, you will need:
1)Torque wrenches: One in foot pounds, one in inch pounds (optional). You will not be able to torque the cylinder head cover bolts properly if you don’t have an inch pounds wrench, but I doubt those bolts are too crucial.
2)17mm deepwell socket. Autozone sells them individually. Impact socket is not necessary, so the standard one will work.
3)New radiator fluid. Match the color.
4)About 14 inches of socket extensions to reach pulley bolt.
5)Floor jack to raise the front of the vehicle onto jack stands.
6)2 Jack stands to support the front of the car.
7)Permatex black liquid gasket from autozone.
1. Remove the radiator fluid through the radiator valve, and empty the reservoir. You will still have a lot of fluid in your system after you do this. You don’t have to take out the thermostat. Put the valve back in.
2. Disconnect the negative battery cable. If you want, you can life just the left side of the car, but you will need an extra jack stand no matter what. Do not jack up the car from the front jack point because you will bend your frame upwards! Never use that jack point. What I do is I jack it up from the sides and then slip a jack stand under the jack stand point. Remove front left wheel.
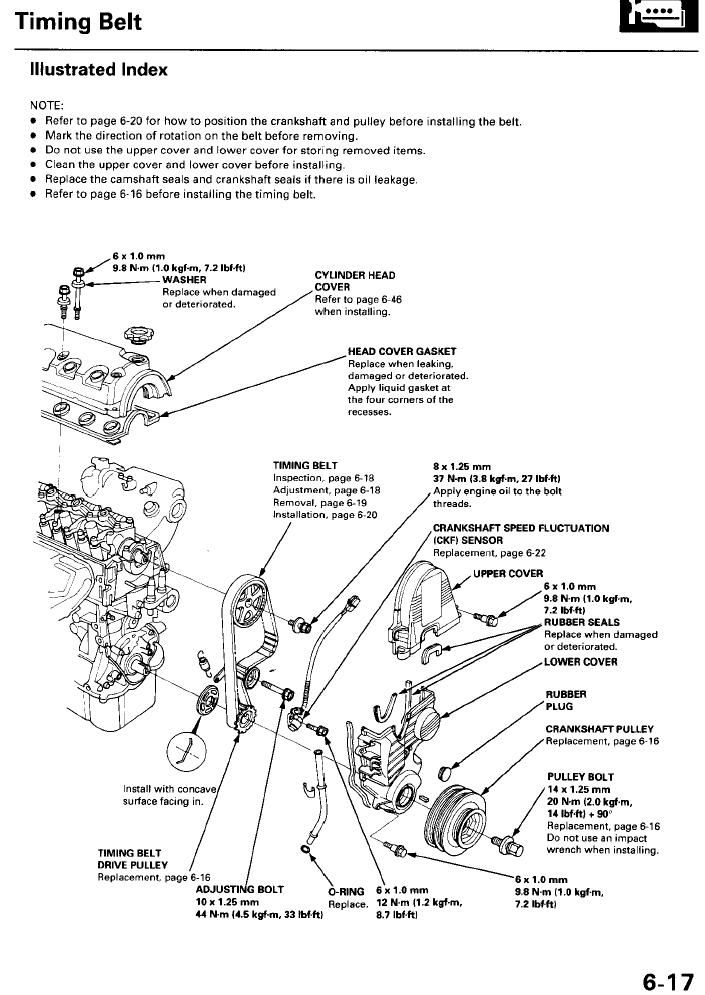
3. Now that your car is up, remove the valve cover. Next, remove the upper timing belt cover.
4. Loosen P/S pump bolts and remove the belt. Unmount the pump and set it over the windshield washer fluid or somewhere out of the way. Be careful that the reservoir isn’t spilling fluid.
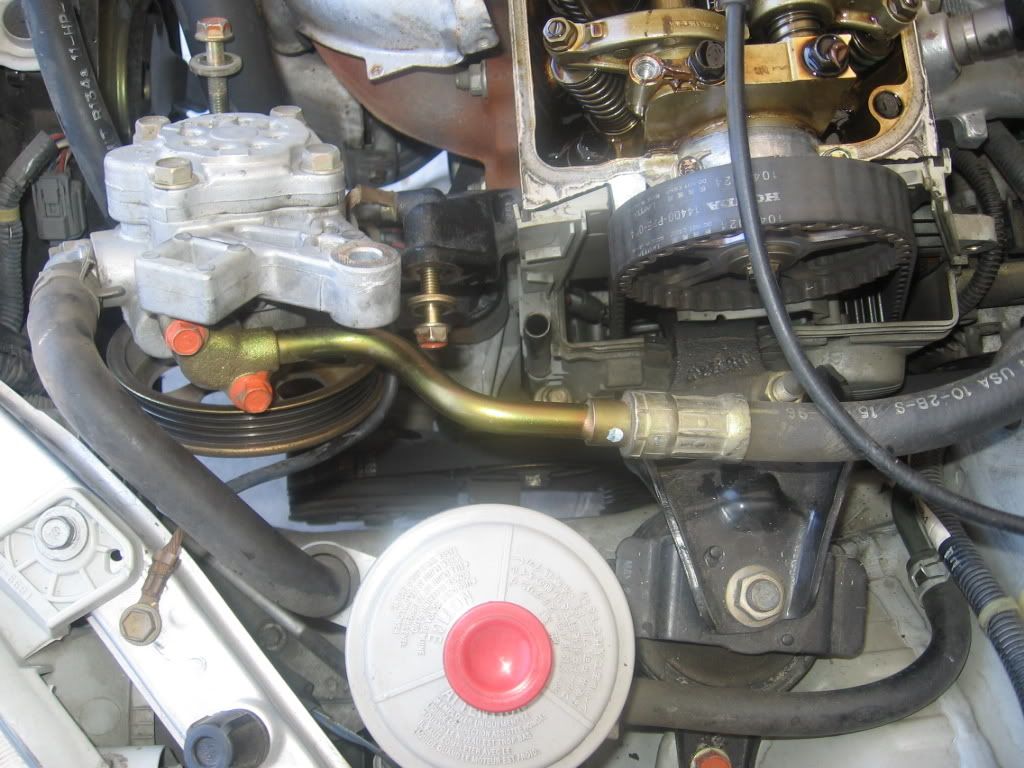
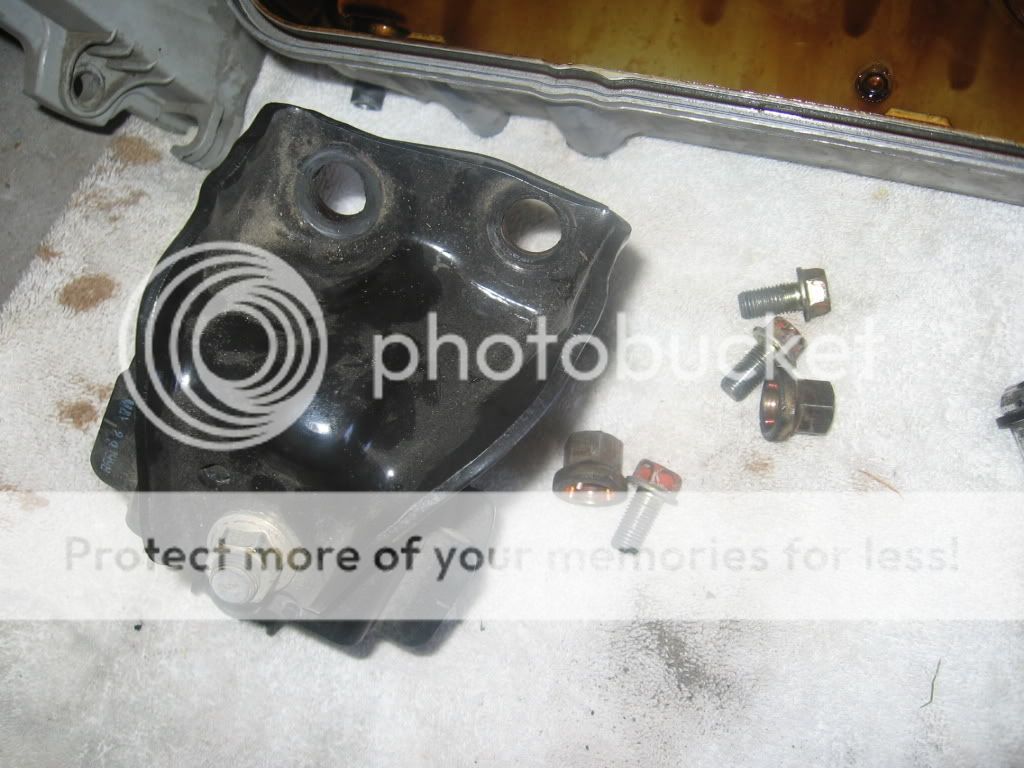
5. Now that you can move the P/S hose out of the way of the motor mount, remove the motor mount using the deepwell 17mm socket you have. Then, remove the 3 bolts holding the mount to the firewall.
6. Loosen the alternator tension bolt. Next, go under the car and find the alternator pivot bolt, and loosen that. Now you will be able to pull the alternator towards the front of the car, which allows the belt to be slipped off.
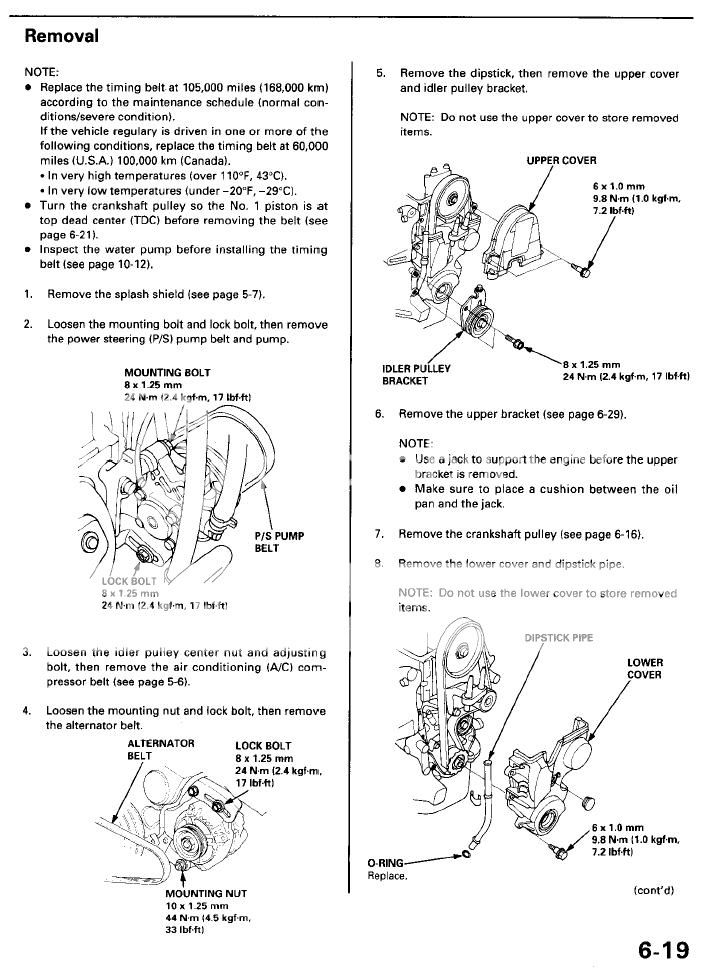
7. The A/C belt is tensioned by that gold pulley you see down there. In order to remove it, take a wrench and loosen the idler pulley nut and then rotate the adjustment bolt counter clockwise enough so that you can slip the belt off. You won’t be able to take the belt off because of the motor mount bracket. Now, unscrew the idler pulley nut, remove the pulley (be careful not to lose the two parts in it) and then remove the assembly completely off the engine. Remove the dipstick pipe.
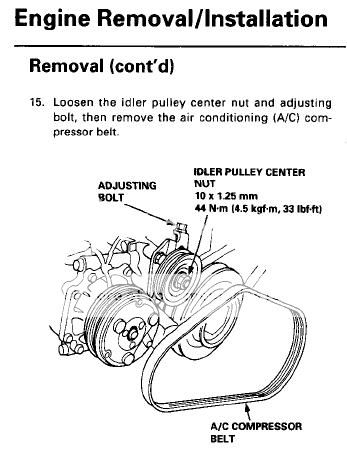
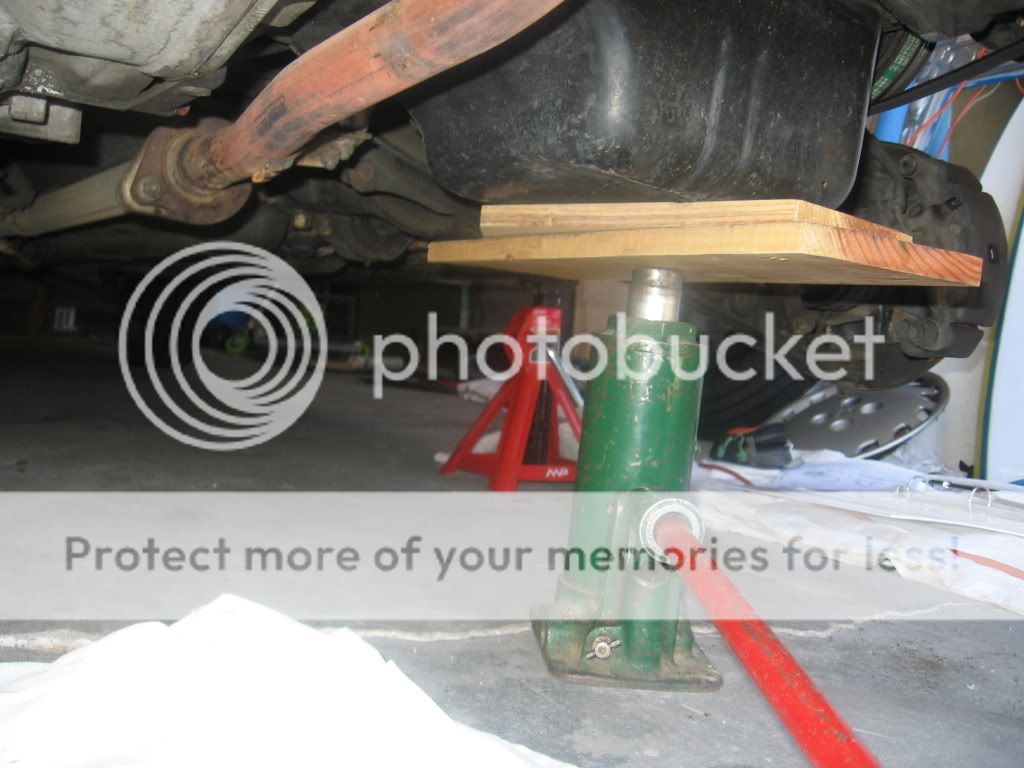
8. To remove the AC belt, you do not have to remove the AC pump and AC bracket. Because you took the top motor mount off, your engise is resting on the bottom torque mount. What you can do is support your engine with a jack under the oil pan, such as your honda tire jack. Make sure you have a piece of wood under there not to damage the oil pan! Now you can remove the two torque mount bolts holding the mount on. Then, lower the engine further with the jack until there is enough clearance over the torque mount for the belt to slip through. You can then slip the new belt in, raise the engine until the mount touches the firewall, then bolt the torque mount back on. You can now remove the jack if you want.
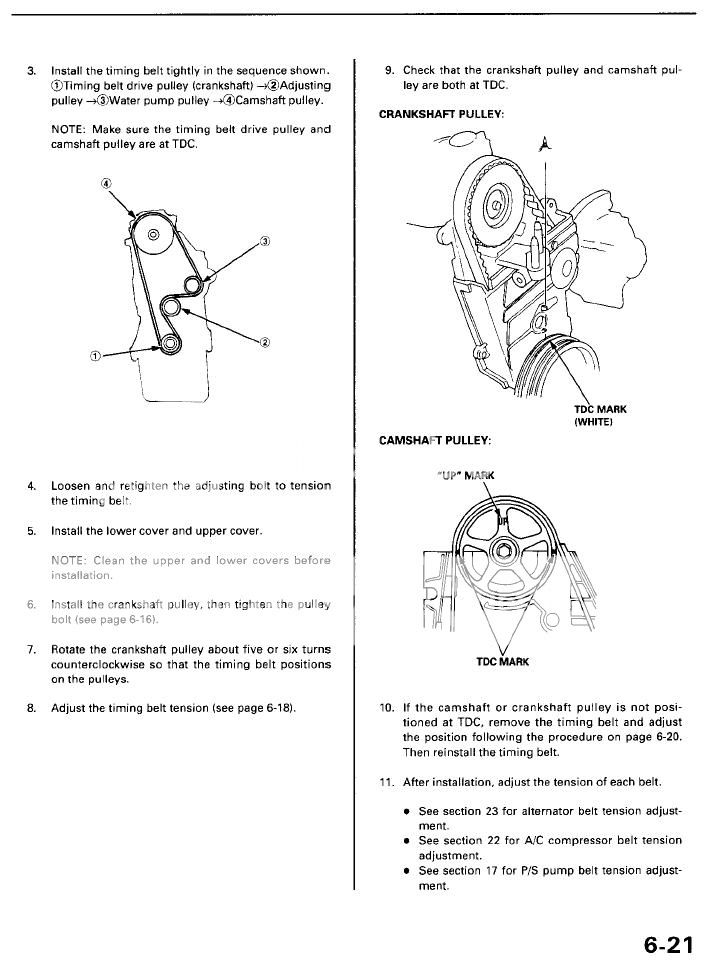
9. Now you’re going to rotate the engine to TDC. Get your extensions, small breaker bar or ratchet, 17mm socket and turn the engine counter clockwise until you’re at TDC. The easiest way to check tdc is the look at the engine side of the pulley as it’s more precise. But it’s not all that crucial to be precise because when you remove the crankshaft pulley bolt, you will probably move out of TDC a bit. (see pic 6-20 below)
10. Now you’re going to remove the crankshaft pulley, which will be the hardest part because it’s on there at about 180ft lbs. Get your two breaker bars, 50mm crank holder, 17mm socket, and pipe together. Remove the bolt using the method shown in the video below. Make sure it’s all stable and securely held, and that your girlfriends face doesn’t happen to be in the wheel well because happy things might not happen if it slips out.
11. Don’t worry if you’re past TDC, we will take care of that later. What you DON’T want to do is to move the camshaft gear or crankshaft gear when the timing belt is OFF. So make damned sure you don’t rotate them accidentally. Remove the pulley bolt and pulley. When you remove the pulley, a rectangular key will pop out. (see pic) Don’t lose this! You cannot put back the pulley without it.
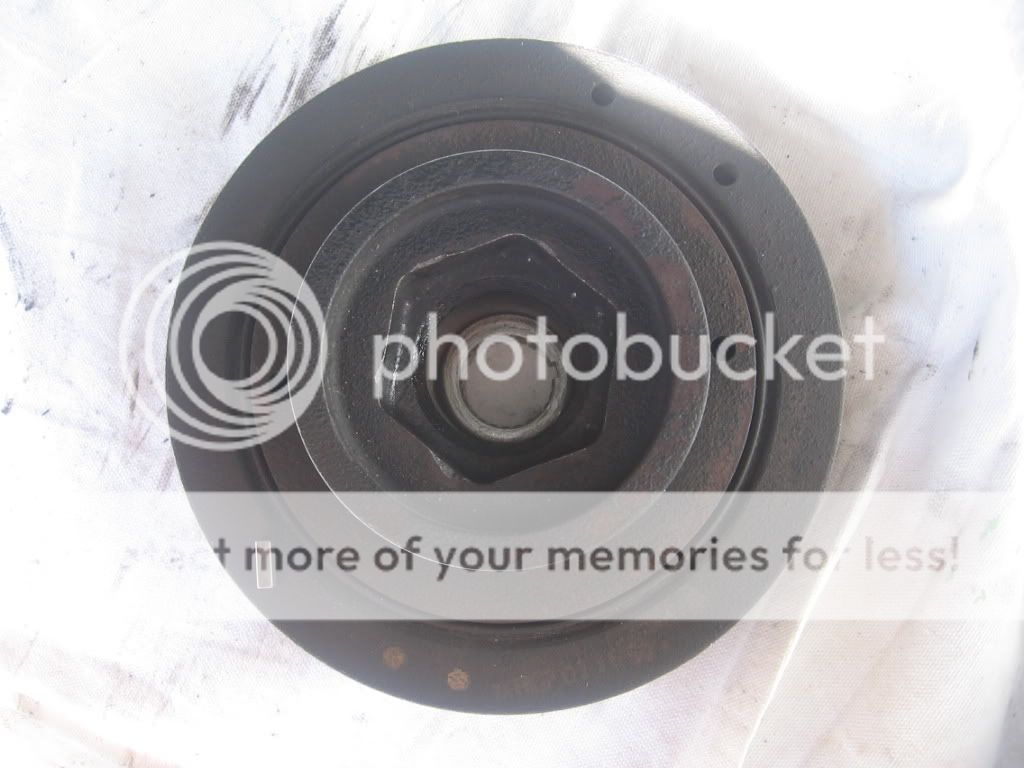
12. Remove the lower cover, and the CKF sensor next to the drive pulley. The sensor might be optional(?). Remember to put it back in if you take it off.

13. Again, make sure camshaft is at TDC and/or that they haven’t been moved independently. Loosen the tensioner, remove the belt, and remove the tensioner.
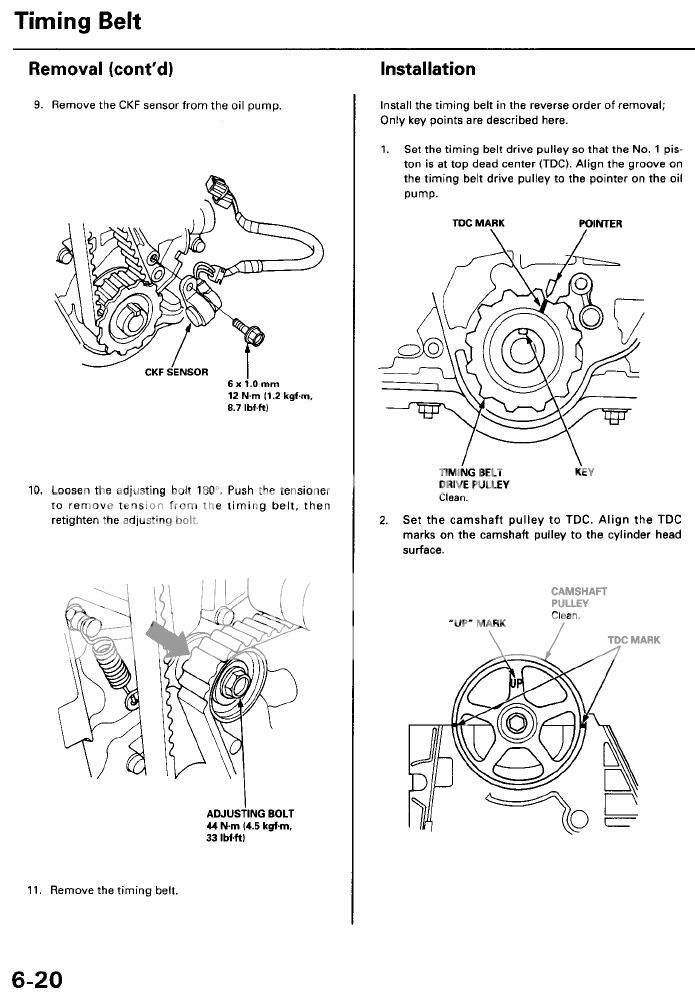
14. Place a bucket under the water pump. Remove water pump –fluid will leak out– and replace with the new pump and seal. Add the new tensioner to the engine and tighten it slightly. Add the timing belt over the gears in the sequence shown below. Loosen the tensioner to tension, then tighten it a good amount.
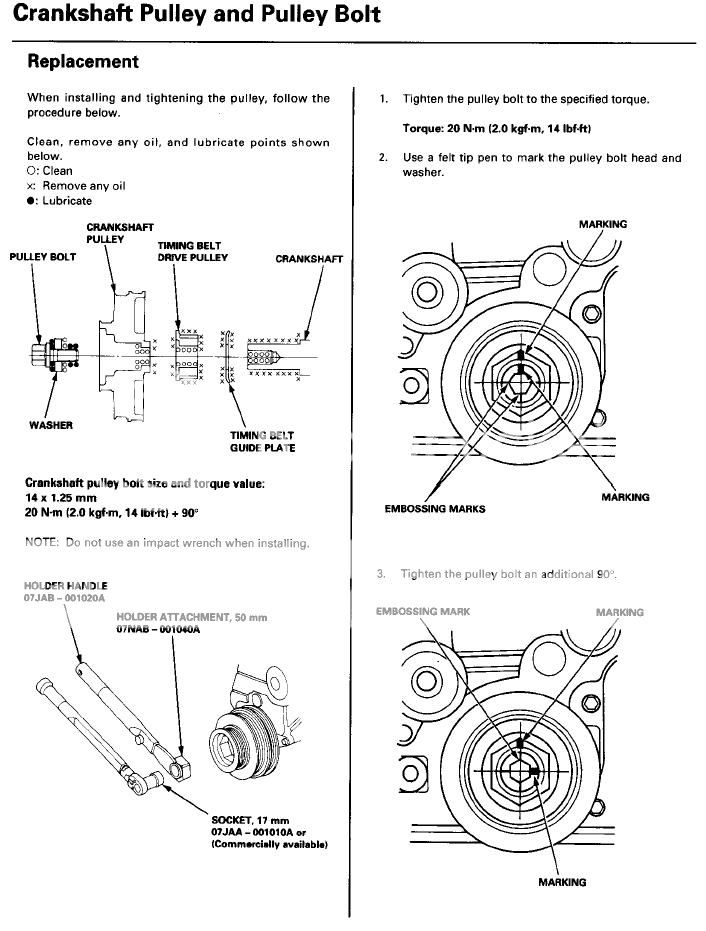
15. Before you Install CKF sensor and lower cover, check to make sure the upper mount bracket isn’t loose. Tighten it and add locktit to bolts if it is. Install CKF sensor and lower cover and reinstall crank pulley,Do not forget the key. Oil the pulley bolt as shown below, and tighten the pulley fully. Rotate camshaft pulley 5-6 turns, slowly, to make sure you did it properly. If it’s okay, rotate an additional 3 teeth or more. Loosen tensioner, then re-tighten it fully. Hold the long part of the timing belt and twist it. It shouldn’t twist more than 90 degrees. If it does, it’s too loose so you need to retention it.
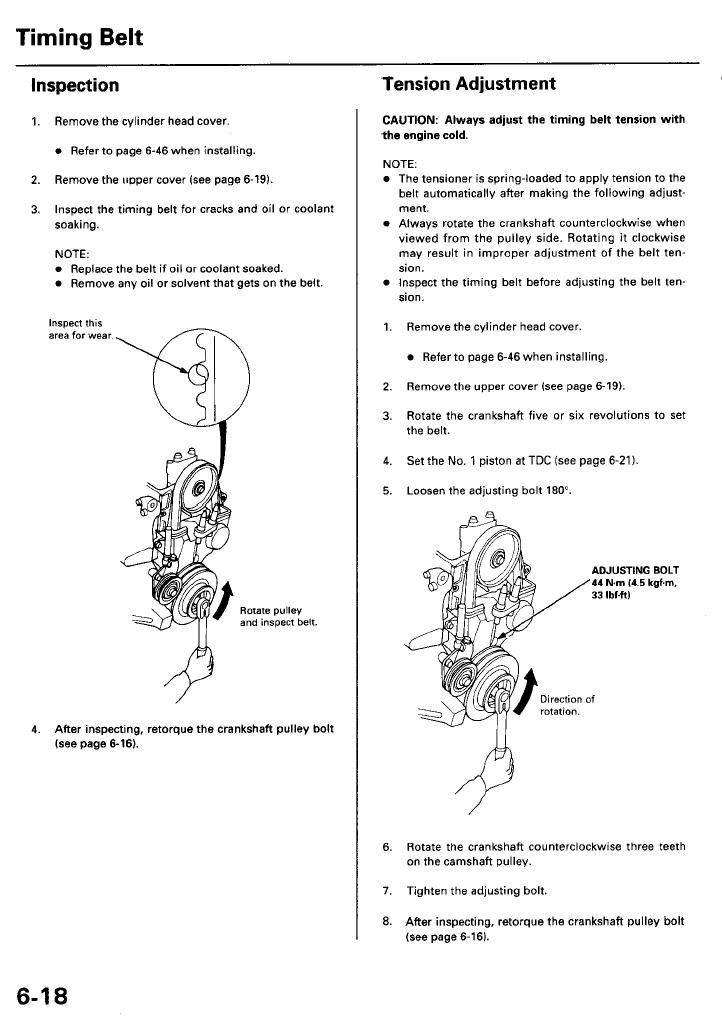
16. Check TDC on camshaft and crankshaft pulley. The best and easiest way to do this is to place the crankshaft pulley at TDC first, which is the white mark. (refer to picture above) There are 2 TDC-finder marks on the lower cover, just like you have a rear and front sight on a firearm. Align the white mark through the sights. Now, look at your camshaft pulley on the engine side. Is it at TDC? the two slits should batch with the head. If it doesn’t, your camshaft and crankshaft are not in sync, so you will have to remedy that. (6-20) Don’t forget to install the dip stick tube.
17. Go ahead and turn the engine (with wrench) some more just to make sure it’s all good.
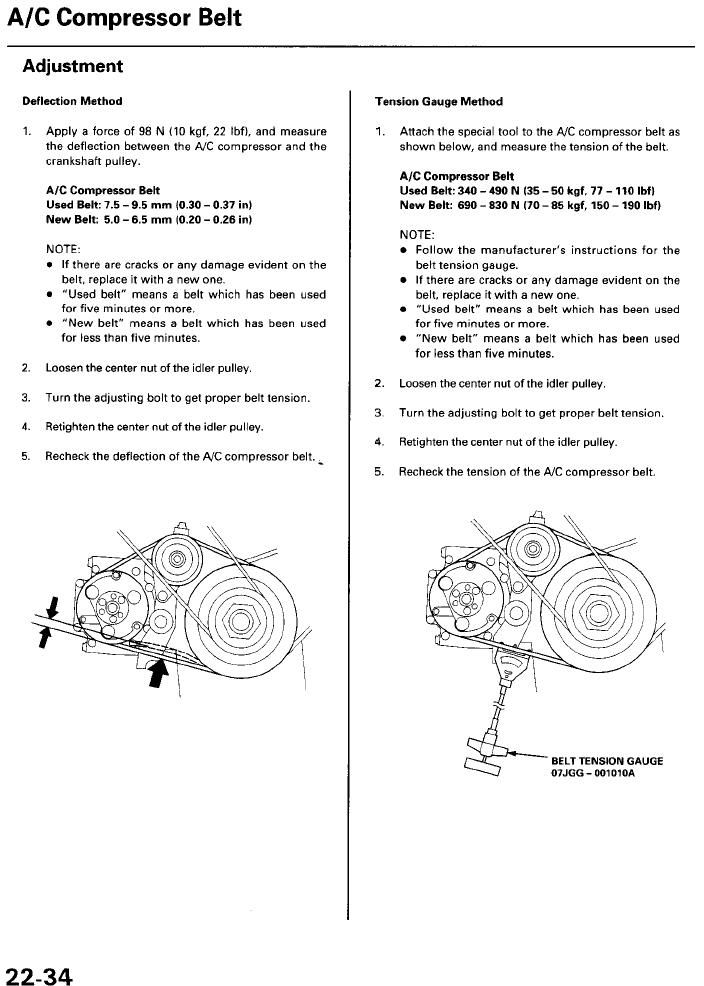
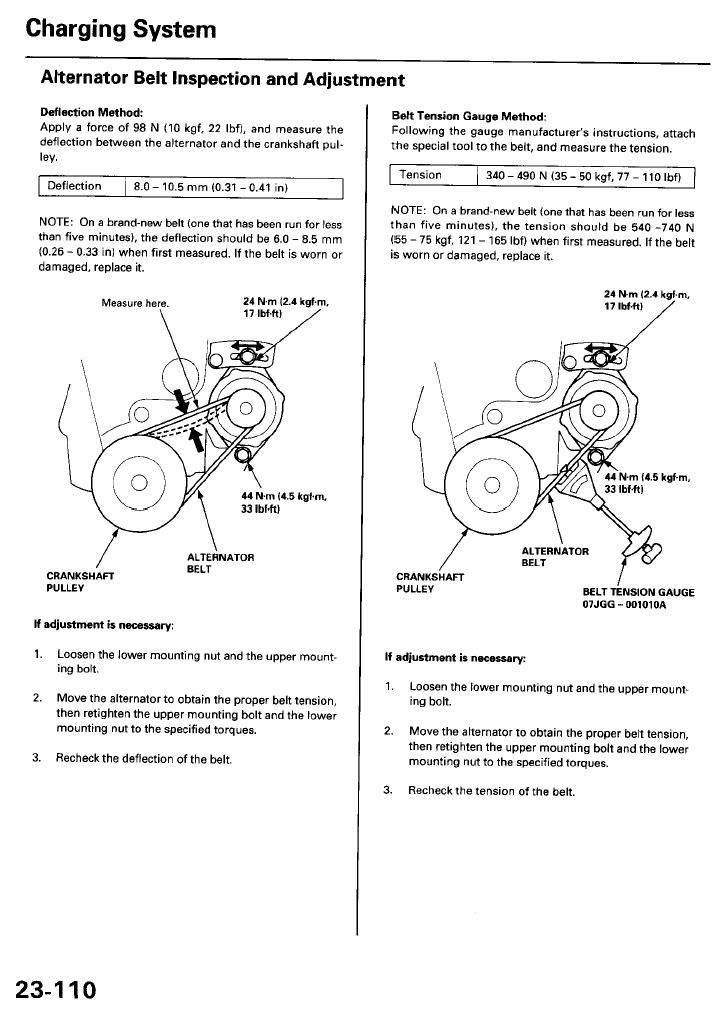
18. Install drive belts. Just make sure the belts are semi-tight, but not so tight that they have no play. Do the A/C belt first, then the alternator. To tension the alternator, put a breaker bar in front of the alternator and behind the engine as shown in the pick. Push it back, and tighten the travel screw with a wrench. Don’t forget about the bottom screw.
19. Install the upper motor mount, then install the PS pump and belt. The PS pump has a box on the top that you can slip a 1/2 break bar into.
20. Reinstall upper cover. (not head cover)
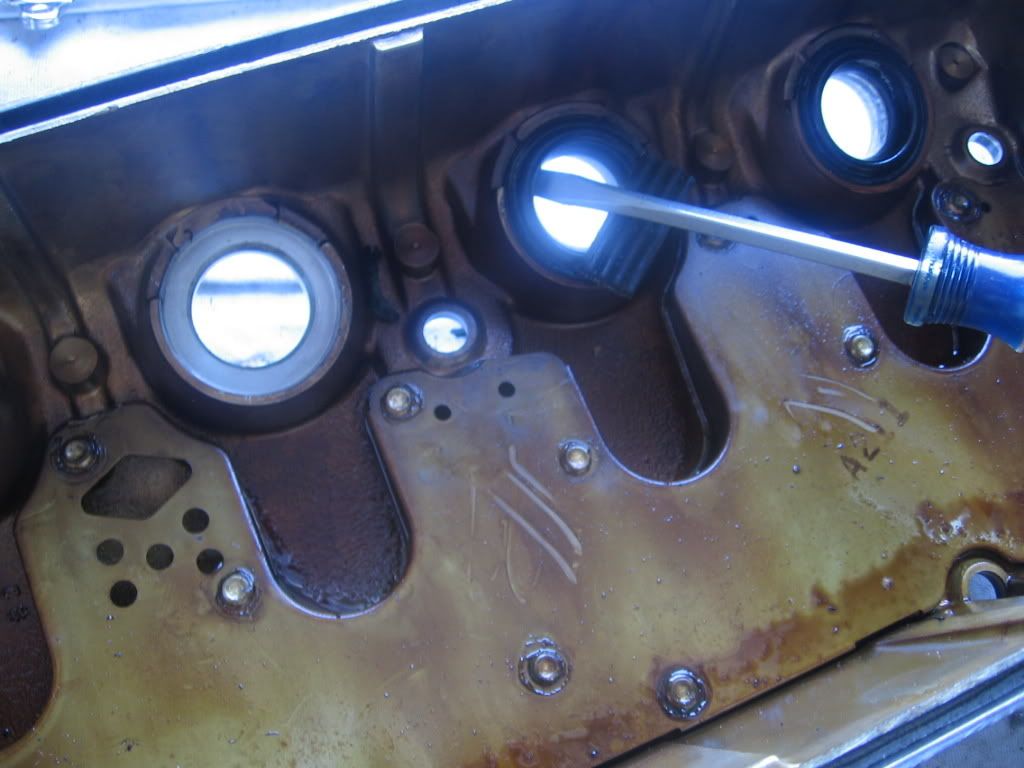
21. Remove old oil seals and install new ones. Do this by prying with a screw driver, then gently hammering in the new ones. Also, add the new rubber washers to your head cover bolts. Add oil to the inside of the washer and press them on using gloves. It was a bitch. The extra one is there in case you tear one.
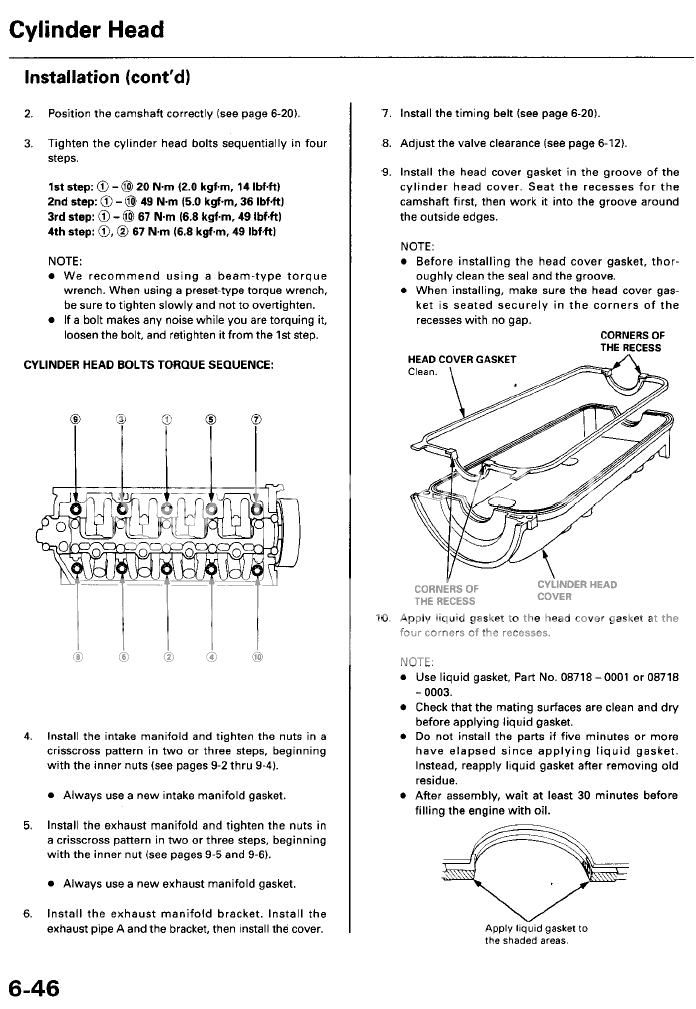
22. Before installing the head cover, scrape off old liquid gasket with a flat piece of plastic rather than a metallic object. Wash area with simple green or whatever. When you actually slip on the head cover with the new plug seals, be careful not to damage them. They may get squashed and torn! Pay special attention that the spark plug tubes come all the way through and into the plug seals.
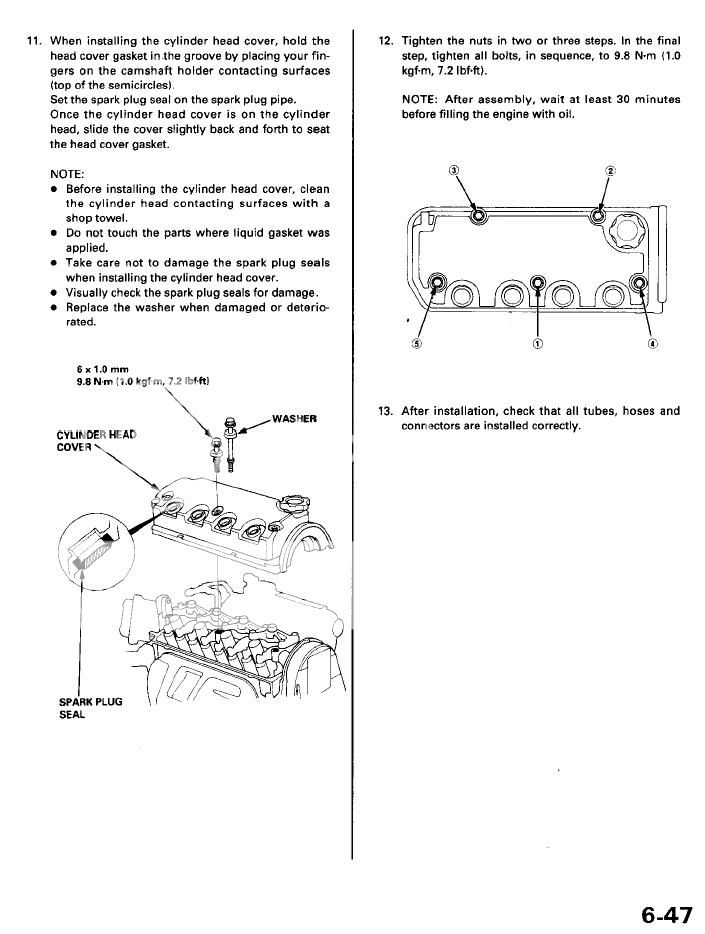
23. Crank engine some more by hand, just to make sure. Reinstall everything the way it was. Lower car, reconnect small parts like throttle cable and battery cable.
24. Remember, you have no coolant in the car. Put your heater to full heat, and fan to full. Open your radiator cap and place a funnel in there. Refill the coolant reservoir first. Start the car. It may have some difficulty starting. Refill coolant as the car runs until the air is out of it. You may have to add some later or the next day.


 Posted in
  Tags:
Tags:
Amazing right up!
Thanks so much…
Ben
Never seen anything like this!=O
Doesn’t get any better DIY instructions than this!=D
Thank you very much!:)