
 Posted in
  Tags:
Tags: This is a Front Spring Replacement DIY for Second Generation Lexus GS’s (1999-2000 Lexus GS 400, 2001-2005 Lexus GS430, 1998-2005 Lexus GS300)
Works For:
1998, 1999, 2000, 2001, 2002, 2003, 2004, 2005 Lexus GS Models
Lexus GS Models include: GS 300, GS 400, GS 430
Source: ClubLexus
Special tools
14mm deep socket (3/8″ drive) for strut tower nuts ($4)
17mm impact socket (1/2″ drive) for lower shock bolt ($8)
21mm impact socket (1/2″ drive) for wheel nuts ($8)
Ampro T70570 Spring Compressor (Advanced Auto Parts, $30) — can be driven with 21mm socket or directly with 1/2″ drive
Pitman arm puller, adjustable (not necessary if not detaching upper suspension arm)
Safety goggles – for things that go pop
Best practices
Most of the nuts and bolts in the wheel well are exposed to a good deal of weather.
Use WD-40 on nuts/bolts before removing and a modicum of engine oil before reattaching.
Use big wrenches whenever possible and move things slowly.
Read the whole thread before beginning your project.
Don’t be afraid to use the force or invoke antiquarian gods of workmanship.
Time
1 hour per side for fronts (first one took 1.25 hrs, second .75 hrs)
1.5 hours per side for the rear (first one took 2 hrs, second 1 hrs)
5 hours total.
Up in the Air and off with the Wheels
Secure the car with jack stands.
Bear in mind that the car will come down farther when finished.
FRONT
Torques
Lower shock bolt: 116 ftlbs (wow)
Upper suspension arm bolt: 64 ftlbs
Strut tower nuts: 41 ftlbs
Piston rod lock nut: 20 ftlbs
Stabilizer bar nut and bolt: 41 ftlbs
Remove ABS speed sensor wire bolts


NOTE: Speedie advises treating the ABS sensor wires as though they are tripwires for explosives. Breaking or damaging these lines can lead to expensive repairs.
There are two bolts, one on the wheel well, one on the shock, that guide the ABS speed sensor wire.
By removing both, the wire can be moved down and out of the way.
(The shop manual says to remove the ABS speed sensor and brake caliper. Neither is necessary.)
Detach upper suspension arm from steering knuckle
NOTE: Several people have said this is NOT necessary, that it is possible to slide the shock out with the steering knuckle still attached. Flossn did it by turning the wheel, avoiding stress on the brake line in the process. DoubleWhoosh suggested that if you do decide to detach this, leave the nut on the stud so that when the joint separates, it can’t fall or otherwise detach violently, which is a really good idea; in addition, he suggests turning the wheels out when working on each side to reduce stress on the brake line.

Remove the pin. Remove the nut. Now it gets fun.
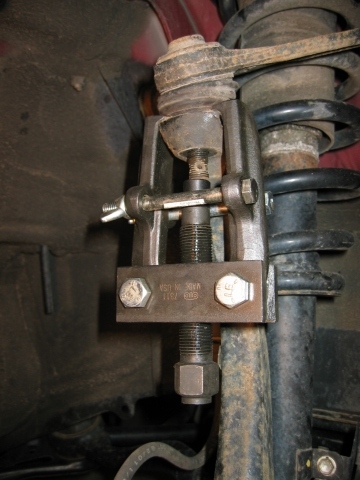

I used a pitman arm puller to press out the stud. You just turn it slowly…slowly…slowly…and then BANG! the stud releases.
The rotor and brake assembly now moves freely, supported only by the lower ball joint. Secure the assembly with string to avoid pressure on the ball joint and stress on the brake line. (Above picture was taken before using string; you can see the stress on the brake line.)
Detach stabilizer bar from stabilizer bar link
Remove the nut and the bolt (two separate attachments). Do this on both sides to allow the sway bar to fall and the bar link to be rotated down, allowing access to the lower shock bolt (see next picture).
Remove the front shock absorber
Hold the lower shock nut (19mm, facing rear) in place with a wrench and use a breaker bar to loosen the lower shock bolt (17mm, facing forward – use a 6-faced impact socket to avoid damage to the bolt). It’s HARD; this is one of those great bolts that the car actually sits on. Remove the bolt, and the lower suspension arm will drop a little, leaving the strut free at the bottom.

Loosen the piston rod lock nut in the engine bay. DO NOT REMOVE IT; startling things will happen if you do.
Remove the three strut tower nuts (14mm deep socket) in the engine bay.
Remove the strut.
Disassemble the strut
Compress the springs until pressure on the top and bottom is relieved.
Remove the piston rod lock nut. It may still be under some pressure, which will prompt the assembly to pop apart, which can be fun (guard your testicles).
Assemble the new strut
Compress the new L-Tuned spring. It’s hard. You can only grab five rings, and you have to compress the whole spring from 13″ to 10.25″ total length, which will give you enough to build the new strut.
Assemble new strut and thread piston rod lock nut.

Aligning the assembly can be tricky. To ensure a perfect fit, loosen the spring compressors so the spring tightens but not so much you can no longer turn the tower bolt assembly against the spring. Put the shock absorber in the car; push the tower bolts up through their respective holes and secure it with one tower nut. Rotate the lower shock absorber AND spring together to align the shock with the shock absorber bracket. Once aligned, remove from the car and remove the spring compressors.
Install the shock absorber
Repeat for the other side