
 Posted in
  Tags:
Tags: Source: ClubScionTC
Oil Change Procedure for 2005-2010 Scion TC
Works for:
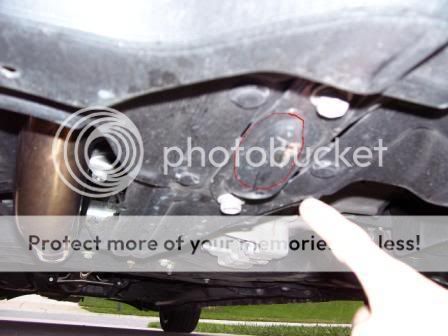
2005 Scion TC
2006 Scion TC
2007 Scion TC
2008 Scion TC
2009 Scion TC
2010 Scion TC
This is for those who aren’t sure if they can change their own oil or if this is their first car and they want to learn how to do a few things. Hope this helps.
Tools needed:
– Ratchet Wrench
-14mm Socket
-Oil Drain Pan
-Funnel
-Filter wrench (not sure the size but get one by matching an OEM filter up to one in an auto shop)
-10″ wrench extension to use with the oil filter wrench
-4.2 quarts of your oil choice and a new filter
1)Loosen the oil fill cap before starting. This will prevent an air lock and will help the oil flow faster, and easier.

2)This point is where you position your floor jack (if you have one). If you don’t have one, use the scissor jack that came with the car on the passenger side lift point (located in your manual). Lift it up enough so that you can work under there.
3)This is the oil drain plug on the oil drain pan (black). The bolt is a 14 mm bolt. Place oil catch pan under oil plug. Loosen oil plug and allow oil to drain. When oil is barely flowing anymore, replace the plug and tighten to a snug feel. DON’T OVER-TIGHTEN OR CROSS-THREAD THE INLET!!

4)This will be your friend for the oil filter. Not exactly sure the diameter, but get an old filter or find one generic one at the store that fits your car and match up the cup to that filter. I use a 3/8” drive b/c that’s the tool set I have.

5)Locate the oil filter (yours may be black if it’s the stock filter). Place the cup on the bottom of the filter with your wrench and extension (if necessary) attached. Loosen the filter. REMEMBER: RIGHTY TIGHTY, LEFTY LOOSY. Let oil drain slowly as you start to unscrew it. When loosened completely, remove old filter and clean off engine block with microfiber cloth or rag. Add a little bit of oil (dip your finger in a quart and apply) to the new filter’s black rubber o-ring. **This prevents the filter from getting stuck for the next interval due to high heat and pressure. At this point, I add a little oil in the filter (enough to fill it ½ way), match the thread back up with the filter thread and engine thread. Screw on and make sure filter sits flush. When your turning begins to feel snug, give it another ½ – ¾ turn. DON’T OVER TIGHTEN OR YOU’RE NEVER GOING TO GET IT OFF NEXT TIME. TIGHT, BUT NOT WRENCHED ON. ***Do this by hand and not with the filter wrench.

Lower your car.
LAST: Go back to where you loosened the fill cap in the engine bay and add 4 quarts of your desired oil. Replace the cap, start car, let idle for 1-2 minutes and check for leaks.
Removing the maintenance required light goes like this:
Make sure the ODO reading is set on the car
-Press and HOLD the mile reset button and turn the key to the ON position (still holding the button)
-Keep holding the button until you see ALL 0s (000000)
-Let go of the button and turn the car off
Setting your mileage counter
-Again, make sure the ODO reading is set on the car
-Press and HOLD the mileage reset button and turn the key to ON
-Dashes will appear (—–)
-Each dash represents 1000 miles so if you have 5 dashes, the next reading will be set to 5000 miles…adjust it how you prefer
Did this DIY help you out? Thank the member Web at ClubScionTC for this great tutorial!
God damn! What a review mahn! Loved it, everything is explained very clearly with good pics. Going to hit this site again 🙂
I am a 56 year-old manufacturing manager who began life as a mechanic. I just want to say that this was an excellent procedure from start to finish. I only have one very minor suggestion. When naming tools the term “wrench” is far too generic. The item should be labeled as “ratchet wrench” just to clarify the difference between a ratchet, an open end, a combination, allen, box end and all of the many different types of wrenches. It’s not as if I didn’t know, but could you imagine walking up to a Snap-On guy and asking for a “wrench”?
To Douglas: Thanks for the clarification. I changed it in the post so that it specifies that a Ratchet Wrench is the required tool. However, don’t thank me, I did not write the Tutorial, I just archived it on my site so that it is easy for people to find. The original DIY was posted at ClubScionTC.com.
How about some credit to who wrote that?
http://clubsciontc.com/forums/diy-install-guides-23/diy-oil-change-1st-gen-7453/
BrutalHoe, a bit of credit was given in the source link near the top of the page. I also added a link at the very end of the DIY with another link to ClubScionTC and to the user’s profile that wrote this DIY.