
 Posted in
  Tags:
Tags: Replace the Alternator on a Scion TC
Works for:
2005 Scion TC
2006 Scion TC
2007 Scion TC
2008 Scion TC
2009 Scion TC
2010 Scion TC
So, for the past few weeks, the heat has begun to take a toll on my voltage regulator. My scangauge has been noting charging voltage of anywhere between 12.7 and 13.5. My OEM charging voltage for the 4 prior years was 13.8-14.1, so this was a big drop. Today, as I purchased the alternator, I started to drive home and saw that with the a/c on, I was “charging” at 12.5 volts. That’s NO good.
Here’s the how to:
Tool:
-breaker bar
-10, 12, 14, 19 mm socket
-ratchet
-3″ ratchet extension
Step 1:
Disconnect the negative on the battery. Use your 10 mm socket and disconnect the negative terminal and set it away from the post.
Step 2:
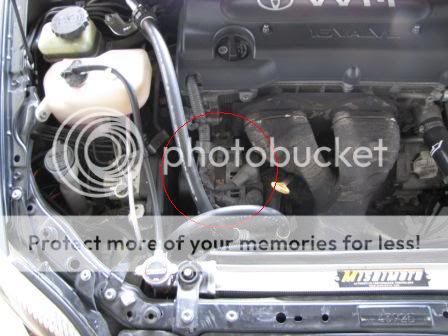
Locate your alternator
Step 3:
Remove the belt from the alternator pulley by using the breaker bar and 19mm socket. Locate the bolt for the hydraulic tensioner above the idler pulley. You will pull the break bar towards the front of the car to compress the hydraulic shock and relax the belt. Once the shock is compressed, slide the belt off the pulley and release the bar slowly.
The red circle highlights the tensioner bolt you will use the 19mm socket on:

Step 4:
After the belt is off, locate the 10mm bolt holding the crank shaft position sensor wire and alternator wires in a loom. The PURPLE circle is the 10mm bolt.

Step 5:
In the above picture, the YELLOW circle is a rubber cover for one of the alternator wires (the hot wire). Remove the cover and expose the bolt. Remove the bolt with the 10mm socket.
Step 6:
In the same picture as 4 and 5 are using, the GREEN circle shows the regulator plug. Simple squeeze the clip and unplug it. Once steps 4-6 are complete, move the wiring aside the best you can.
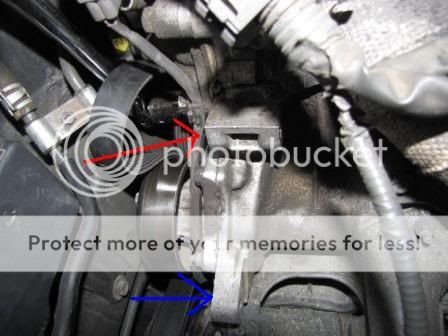
Step 7:
Using your 14mm socket, unscrew the RED circled bolt.

Step 8:
In the above picture, use a 12mm socket to remove the BLUE designated bolt. This one is tricky due to the tight squeeze of the area and it’s hidden from view. Just keep at it and you’ll get it.
Step 9:
Once the bolts are out, pull and lift up on the alternator until it’s free. Once free, maneuver it out from the wires the best you can…BE CAREFUL!
Red and Yellow arrows correspond to the bolts in Step 8:
Step 10:
Slide the new alternator back through the wires, carefully, and position in place. The portion where the 14mmbolt slides through actually slides onto a bracket. Just work it onto the bracket and reinstall both bolts. Colors below correspond to the bolts in Step 8.
Step 11:
Reposition the belt after the bolts are replaced.

Step 12:
Reconnect the bolt from 4. Reconnect the bolt and cover from step 5. Reconnect the plug from step 6.
Step 13:
Reconnect your batter negative terminal.
Step 14:
Start car and let vehicle idle for 5 minutes to reset start up features for the ECU.
Step 15:
Reset windows and sunroof (and radio).
Window/Sunroof reset:
-Pull up on driver’s side window switch for 3 seconds
-Pull up on passenger door window switch for 3 seconds
-Push the close button for the sunroof until you hear roof motor reset
-Open roof to vented position and then full open