
 Posted in
  Tags:
Tags: A Tire Rotation Do It Yourself for 9th Generation Corollas (2003-2008)
Source: ToyotaNation
This is a guide to help you with your tire rotation.
Notes: I am doing this on my XRS that has alloy wheel locks. Your Toyota Corolla might not have them. If so you can discard the part about the lug lock key.
User Warning: This job has the potential to seriously injure you, and cause extensive damage to your property. Use your personal discression when taking on this task. If you do not feel comfortable performing the task: DON’T. I am not responsible for any incidents or accidents to you, or the damage or malfunction of your property. I trust you will make safe choices if you choose to perform this task.
Time: 15-30min
Parts: None. You reuse everything. Cost $0
Tools: Jack and two jack stands, 21mm socket and ratchet, torque wrench, rubber gloves. I used a metal pipe on my ratchet to gain more torque when loosening the wheel lug nuts. If you have alloys you will need the lock key for that lug nut. If you have a pneumatic gun you can use that to take off the nuts instead of the ratchet.
From the Toyota Corolla Owners manual and Owners Manual Supplement.
Quote:
Tire size and cold tire inflation pressure
kPa (kgf/cm2 or bar, psi): Front and Rear pressures are the same for all 9th Gen Corolla models.
(Corolla CE) P185/65R15 86S: 210 (2.1, 30)
(Corolla LE, S) P195/65R15 89S: 210 (2.1, 30)
(Corolla XRS) P195/55R16 87V: 220 (2.2, 32)
Compact spare tire T125/70R16 96M: 420 (4.2, 60)
Quote:
Wheel nut torque
N-m (kgf-m, ft-lbf)
103 (10.5, 76)
Quote:
Checking your Tires
Check the tire’s tread for tread wear indicators. If the indicators show, replace the tires. The location of the tread wear indicators is shown by the “TWI” marks, molded on the sidewall of the tire. When the tread depth wears to 1.6mm the indicators will appear.
The effectiveness of snow tires is lost if the tread wears down below 4mm (0.16in.).
If you have tire damage such as cuts, splits, cracks deep enough to expose the fabric, or bulges indicating internal damage, the tire should be replaced.
Any tires which are over 6 years old must be checked by a qualified technician even if damage is not obvious
To equalize the wear and help extend tire life, Toyota recommends that you rotate the tires every 16,000km (10,000mi) or sooner for your Toyota Corolla.
Rotation placement
D (Drivers side), P (Passengers side)
F (Front), R (Rear)
DF to DR
DR to DF
PF to PR
PR to PF
Here’s a pic of all but one of the tools I used (2.5ft pipe is missing).
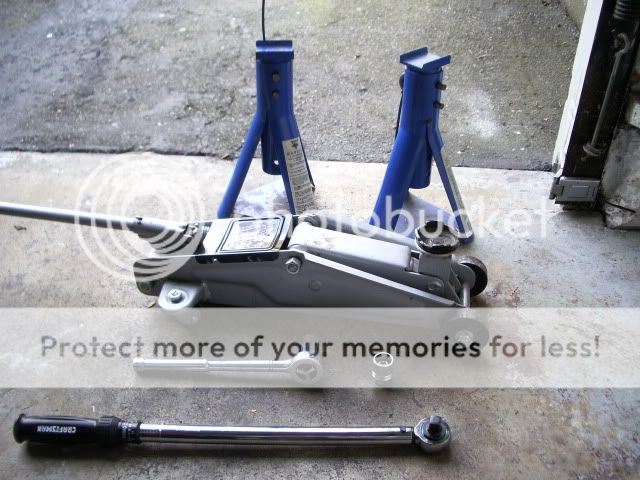
Back: Two jack stands, trolley jack
Left middle: Ratchet with 21mm socket
Right middle: Alloy lug lock key.
Front: Torque wrench
Let’s get started…
With your car on hard level ground, set the e-brake and put the car in 1st gear or Park.
The tire rotation pattern is quite simple the fronts go to the back and vice versa on the same side. No crisscrossing or side swapping.
With the car still on the ground loosen all the lug nuts on both front and rear wheels of one side of the car. It doesn’t matter if you do the passengers or drivers side first. You will need a 21mm socket with preferably a breaker bar or a ratchet extension for extra torque (lug nuts should be tight), or pneumatic gun. I used a 2.5ft metal pipe on a standard ratchet. If you have alloys you will need the key for the lock lug nut, the lock key accepts a 21mm socket.
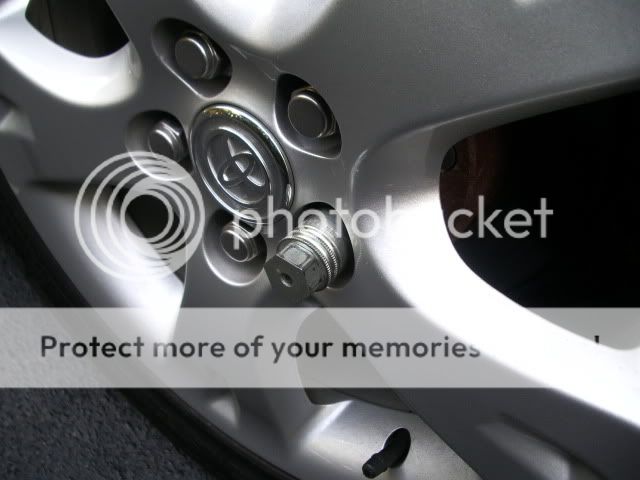
Pic of the alloy wheel lock key on the alloy wheel lug lock
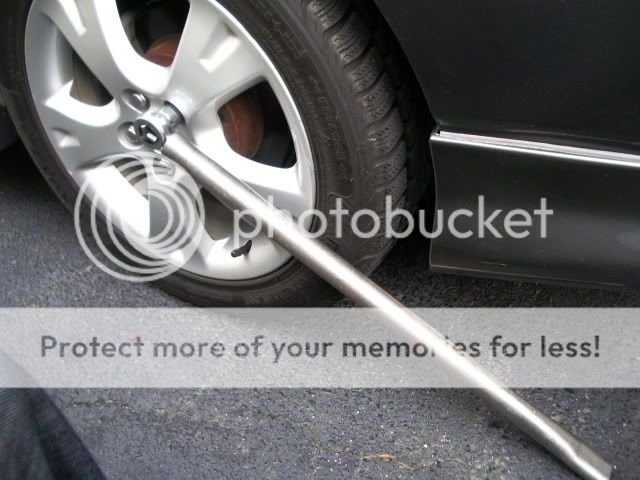
pic of the 21mm socket/ratchet with 2.5ft extension
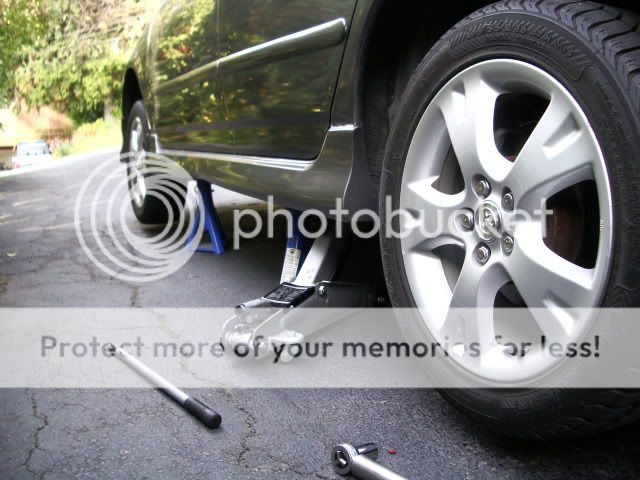
With the lug nuts on one side of the car loosened jack the front up on the side you’re working on; I used the drivers’ side jack insert just aft of the front tire, and support the jack with a jack stand right next to it. Give the tire (in the air) a good shove to make sure the car is sturdy on the stand (so the car doesn’t fall on you while you’re working underneath). Lower the jack with the car safely supported on one jackstand.
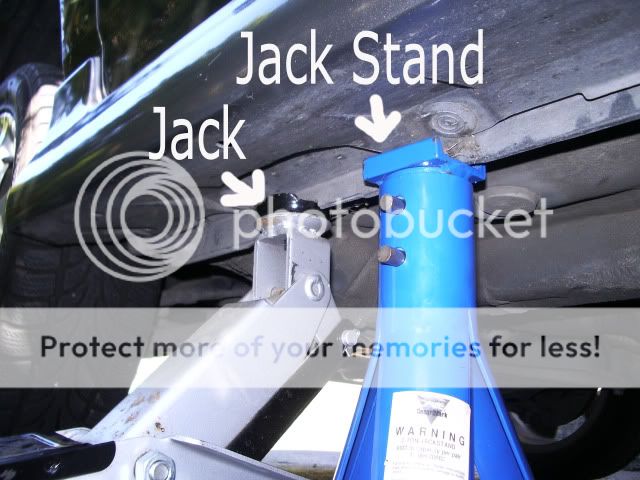
Next jack the back up on the side you’re working on; I used the drivers side jack insert just before the rear tire, and support the jack with a jack stand right next to it. Once again give the tire (in the air) a good shove to make sure the car is sturdy on the stand (so the car doesn’t fall on you while you’re working underneath). You can leave the jack slightly raised and in position for quicker lowering as long as the cars weight is 100% on the jack stand.
Note: Never work under a car that is only supported by a jack (always work with jack stands). Although unlikely, jacks can fail. There’s a good possibility that you will be seriously injured if the jack fails while you’re under the car.
Pic of my final jack and jack stand job for one side
With one side of the car in the air and safely supported take the wheel lug nuts all the way off with the 21mm socket/ratchet and the lug lock key. The lug nuts should spin decently free, if they don’t they might have been over tighten and you might need a new hub. Put on some gloves and remove the wheels (make a note which wheel was the front and which was the rear).
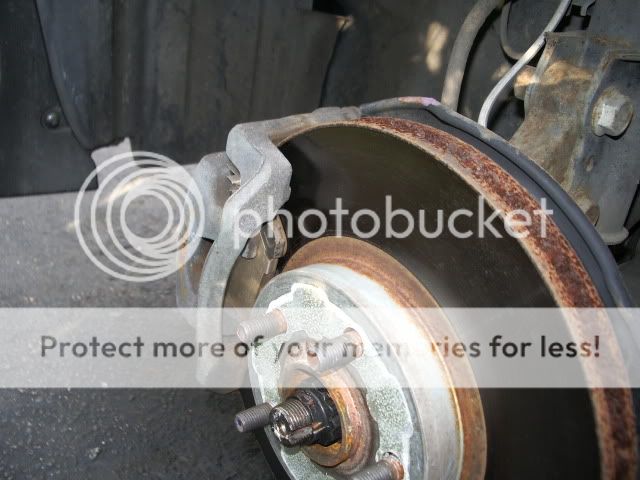
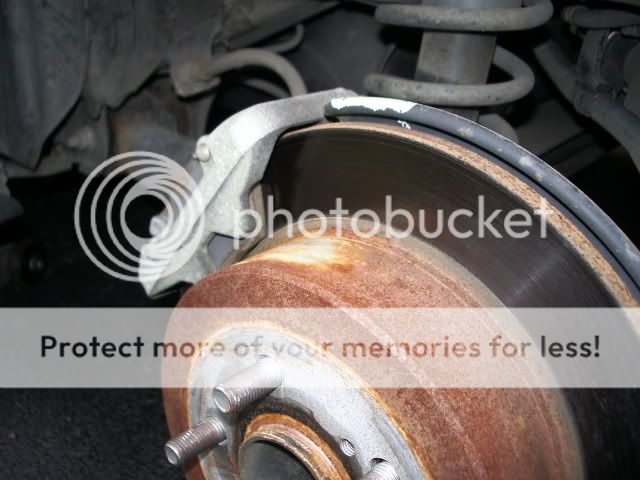
With the wheels off it’s a good idea to check your brakes for wear as well as your Tires for wear or damage. You might even want to clean the inside of the wheels!
Here’s a picture of my brakes which I plan to replace soon.
Front
Rear (discs because it’s a XRS)
The tire rotation pattern is quite simple: The fronts go to the back and vice versa on the same side. No crisscrossing or side swapping… So take the front tire and put it on the back and take the back tire and put it on the front. It also means that you don’t have to take the tires off the rim if you have directional tires (like me).
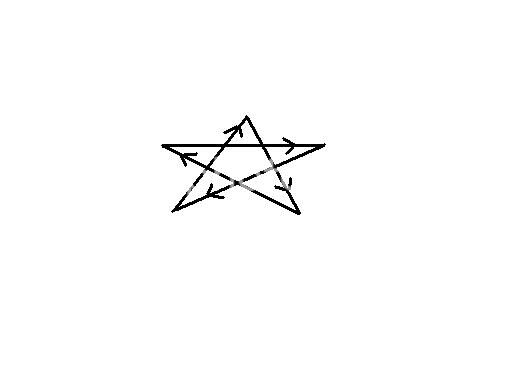
Now put the lug nuts back on for both wheels with the 21mm socket/ratchet and alloy lug key. You should try to put the lug nuts on like a star so that the wheel is strait while the car is in the air. Whenever you torque something with more than 3 bolts you should always torque one bolt then the one across from it to insure that what you are torque-ing down is flush with the surface it’s getting torque-d to.
A picture I drew on paint to illustrate proper wheel nut torque pattern.
Try to make the lug nuts decently tight while the car is in the air.
With both the front and rear wheels lugs decently tight; lower the car to the ground.
With the car on the ground grab your torque wrench with the 21mm socket and set it to either of the settings below. I set my torque wrench to 76 ft-lbf because it was one of the measurements on it. All the below torque figures are the same torque however.
Wheel nut torque
N-m (kgf-m, ft-lbf)
103 (10.5, 76)
Torque the wheels using the star pattern I posted above to insure the wheel is flush and strait. The alloy wheel lock should also be torque-d. You might want to double check the torque after.
Note: If you don’t torque the wheel nuts you run the risks of over tightening them (stripping the lug nuts) or under tightening them (wheel falls off while driving).
Note: Unless you have an expensive pneumatic gun that has torque settings (acts as a torque wrench), you should never use a pneumatic gun to tighten the lug nuts. They might strip.
Congratulations you’ve rotated the tires on one side of the car. Repeat the steps for the other side!
If you have a tire pressure monitoring system (TPS), you will have to initialize it once you’ve finished rotating the tires.
Initializing the Tire Pressure System:
With the tires cold (at 30PSI for CE, LE, S; 32PSI for XRS), put the car in park and hold the Tire Pressure Reset Button till the Tire Pressure Warning Light goes out (a couple seconds). Then press the Tire Pressure Reset Button until the Tire Pressure Warning Light flashes 3 times (about 5 seconds) and then release. Initialization is completed after driving at the speeds of 30 km/h (19 mph) or over for more than one hour.
It will also work with the following parameters:
Vehicle speed is between 50km/h (31mph) and 100km/h (62mph)
The roads are dry, smooth and straight
The number of passengers is 1 or 2 (including driver)
Initializing the Tire Pressure system will not work if the car is moving.
If you have any questions, concerns, or something to add. Feel free!