
 Posted in
  Tags:
Tags: Replace the Rear Sway Bar on an E46 (1999-2005) BMW 3 Series
Works For:
1999, 2000, 2001, 2002, 2003, 2004, 2005 BMW 3 Series Models
BMW 3 Series Includes: 316, 318, 320, 323, 325, 328, 330 and M3 .
Source: M3.MadRussian.net
This job takes about 1.5 and 2 hours of actual work (once you have the car off the ground). If you are not comfortable or competent with working on your suspension, leave it to a professional!
Also, you have to either reuse the stock end links or get a new set (about $15 per). If you plan on reusing your end links you will either need a good puller or better yet a trip to a shop that can pull them off for you. I could not get mine to come off with a 3-prong puller (pulley/bearing puller) and when I tried to use the technique in the BMW TIS disk (holding the link with a vise and pulling on the sway to work it out) I ended up breaking one of the end links. Installing the end links on the new sway is pretty straight forward and does not require any special tools.
THE INSTALLATION OF SWAY BARS CAN HAVE DRASTIC EFFECTS ON YOUR CAR’S HANDLING CHARACTERISTICS. THE USE OF IMPROPER SWAY BARS, INCORRECT ADJUSTMENT AND/OR INSTALLATION CAN MAKE YOUR VEHICLE’S HANDLING UNPREDICTABLE AND DANGEROUS. ALWAYS FOLLOW MANUFACTURERS’ SET UP AND INSTALLATION INSTRUCTIONS. ALWAYS TEST ANY HANDLING CHANGES IN A SAFE AND CONTROLLED ENVIRONMENT.
Note:
- Your back wheels must be off the ground to change sway bars. See Getting car up on jack stands DIY.
- I assume that your car is already up on a lift or on jack stand.
Step 1: Getting the required items together
This job requires:
- A lift or some other method of getting the front wheels off the ground.
- Socket Wrench
- Torque wrench (recommended)
- 6mm Hex Socket
- (2) 13mm Open Wrenches
- Hair Spray or Soap and Water
- Blue Loctite
- A BMW M3 (E46).
- About 1:30 to 2 hours of free time.

Step 2: Releasing the brackets
- When you get under the car and look directly in front of the differential you will see the OEM sway bar.
- If you follow the sway from the center out you will see a bracket on each side that attaches the sway to the body.
- Each bracket is attached with a pair of 6mm hex bolts.
- Remove the bolts from both bracket supports.

View From Rear of Differential


Step 3: Releasing the end links (or the fun begins)
- If you follow the sway bar to the end you will see the end link.
- If you follow the end link up into the suspension you will see the bracket that attaches to the suspension arm.
- If you reach up above the suspension arm and feel around the top of the bracket you will feel a bolt that goes through the bracket and attaches the end link. You will need to remove this bolt to drop the end link out and with it the sway bar itself.
- This requires a pair of 13 wrenches and a lot of patience.
- Once you have released both sides, carefully work the sway bar out of the car.
- Wouldn’t it be easier tho just release the whole bracket from the arm and pull it out with the sway bar? Well, yes and no, if you release the bracket from the arm you will not be able to work the sway bar out of the suspension – the brackets themselves are too big to slide through. You will have to drop the connecting pipe to get it out with the brackets still in place. A hell of a lot more work.


End Link Bracket With End Link Removed

End Link Bracket (out of the car for reference)

End Link Bracket (out of the car for reference)
Step 4: Detaching the end links from the OEM sway bar
- The end links are next to impossible to remove from the sway bar without proper tools.
- The BMW TIS disk recommends that you secure the end link in a padded vise and work the sway bar out of the link. This did not work worth a damn for me. On one side I managed to pull the sway bar out but the bushing stayed on the sway and on the other side the end link simply snapped in half.
- A local suspension shop should be able to pull the end link off for you or you can purchase a new set of end links from your dealer for about $15 per.
- My vote goes for springing for new end links…. Part number is “33-55-2-282-182 Swing Support” – you’ll need 2


Step 5: Installing end links onto the new sway bar
- This is far easier than taking the end links off.
- The end link has a simple rubber bushing on one end and a rubber bushing with a metal center insert on the other. The end with just a rubber bushing goes on the sway bar.
- The end links need to pushed on in approximately the same position as they were on the OEM bar.
- Eibach sways have 2 small tabs about an inch from the end of the sway bar. You will need to slide the end link onto the sway bar past these.
- You will need to lubricate the inside of the end link bushing and the sway bar end in order to get things together smoothly. DO NOT USE OIL OR GREASE!! Use either soap and water or hair spay to coat the inside of the rubber bushing.
- Place the end link of flat ground and push the end of the sway bar in as far as you can (until it is flush with the outside of the end link).
- To finish pushing the sway bar into position, I drilled a 1/2″ hole in a piece of wood and used that as a base to push the bar all the way through.
- Repeat for other side.

Step 6: Getting the new sway bar in the car
- With both end links installed its time to slide the new sway bar back in the car.
- This takes a little bit of patience and you can move the end links around a bit to get things into place.
- I think its easier to slide the bar in to the driver’s side first.
- Once the sway bar is in place, line up the end links in the brackets and slide the bolts in to keep them in place.

Step 7: Securing the end links
- Use a little blue loctite on the nuts and thread them on by hand.
- You need a lot of patience and a pair of 13mm wrenches to tighten the bolts down – tight.
- This is a pain in the ass.
Step 8: Greasing things up
- The 2 new bushings need to be lubricated and attached to the sway bar.
- Some sway bars (Eibach) come with a lubricant – some people recommend using marine grease as an alternative.
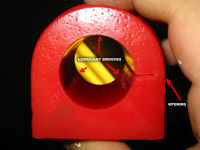
- The inside of Eibach bushings have 3 grooves to retain lubricant. Fill the grooves with the lubricant on both bushings.
- Wipe off any lubricant from the outside of the bushing or you will have a hell of a time getting them to slip onto the sway bar.

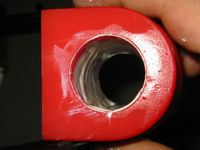
OEM (black) and Eibach (red) Bushings
And Brackets
Step 9: Installing the bushings
- Take the greased bushings and slide them on to the sway bar right at the edges of the long flat center section of the sway bar.
- The location of the bushings should line up with the attachment points for the brackets (removed in step 2).
- These just need to be close, not exact.

Step 10: Installing the brackets
- Slide the factory metal brackets over the bushing.
- Put a little blue loctite on the 6mm hex bolts and secure the brackets.
- These should be torqued to about 20 ft lbs.
- Eibach strongly recommends that you check all of the bolts after about 50 miles of driving – that is a very good idea.
- Remember that you have now changed the way your car will handle – don’t push it till you are used to its new characteristics.
