
 Posted in
  Tags:
Tags: Replace the Spark Plugs on a First Generation Mazda Mazda3 (2004-2009)
Works For:
2004, 2005, 2006, 2007, 2008, 2009 Mazda Mazda3 Models
Source: Mazda3Forums
I’ve seen plenty of people ask how to replace their spark plugs, but haven’t seen a how-to on here. So here it is. ![]()
Replacing your spark plugs is actually quite easy — it should take about 20 minutes tops, and you’ll only need a few tools:
–8mm wrench or deep socket
–15mm wrench
–5/8″ spark plug socket
–Ratchet wrench and extension
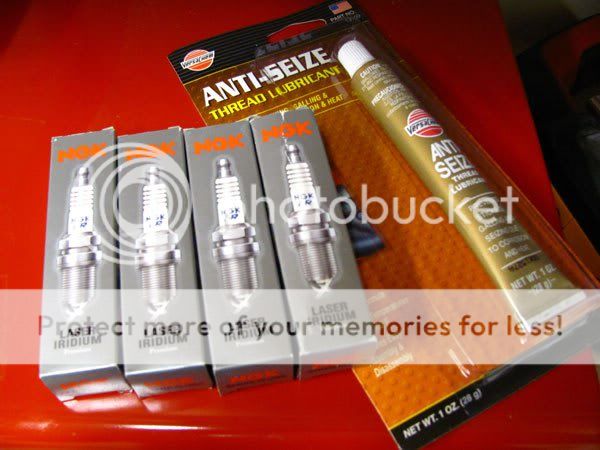
In terms of what spark plugs to use, I decided to stick with the OEM plugs, which are of very high quality — NGK Iridiums. (The OEM plugs are stamped FoMoCo, but they’re made in Japan by NGK.) They run about $12 each on Amazon (which is the cheapest I’ve found them); yes, I know $12 per spark plug is a lot compared to cheap $2 Champions, but considering you can get 70-80k out of them and they’re very well-made, I think it’s worth the extra cost. I wouldn’t use cheap copper spark plugs in my car.
Which model of plugs you’ll need to buy will depend on what year your car is. 2004-2005 model Mazda3’s use different plugs than the 2006-2009’s do due to different cylinder heads (more info about this here, thanks to cali_axela for the link!).
If you want to go with the NGK’s, here’s what to order:
–2004-2005 Mazda3’s, model ITR6-F13, part number 4477 (thanks Mummyman!).
–2006-2009 Mazda3’s, model ILTR5A-13G, part number 3811.
You will, of course, need to order 4 plugs of whatever brand/model you pick.
I have a 2006, so here’s what I bought:

Next, a note about gapping the plugs. “Gapping” refers to adjusting the ground electrode on the end of the plug to be a specific distance away from the center electrode, to produce a spark of a size within the specifications defined by the car’s manufacturer. What it boils down to is this: if you buy the NGK plugs listed above, they come pre-gapped from the factory at a distance that falls within Mazda’s spec. If you decide to buy different plugs, you may need to gap them. There are numerous tutorials online that explain the simple process of gapping spark plugs, and the tools needed to do so.
I’d also recommend getting a tube of anti-seize for the threads, to make it easier the next time you need to replace the spark plugs. Anti-seize should cost about $3.50 from any auto parts store.
So let’s get started:
1. Pop the hood, and remove the engine cover. Just pull up from the edges and it’ll unclip.

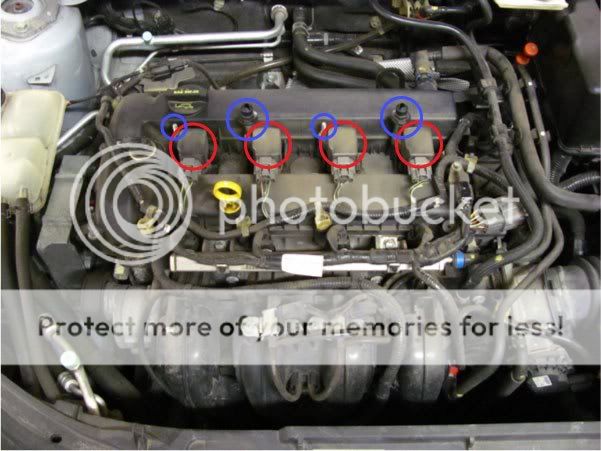
2. The Mazda3 uses a coil-on-plug design, meaning there’s no distributor or spark plug wires. Each spark plug gets its own coil pack, which plugs right on top of it. Each coil pack is secured with a single bolt. Note that two of the bolts have black plastic studs screwed on to them; these studs are for clipping the engine cover down. The coil packs are circled in red below, and the bolts are in blue:
3. I recommend replacing only one spark plug at a time. With your 8mm wrench or deep socket, remove the first coil pack bolt:
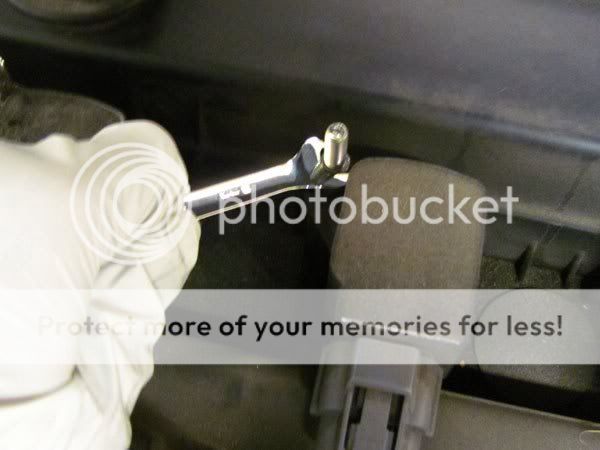
To remove the plastic studs from two of the bolts, use a 15mm wrench to unscrew it, then you can use the 8mm wrench/socket to remove the bolt:

4. With the bolt removed, the coil pack just pulls up from the spark plug. You shouldn’t need to disconnect any cables, just swivel the coil pack out of the way. The plug sits at the bottom of the spark plug tube; here’s a view of the tube with the coil pack removed:

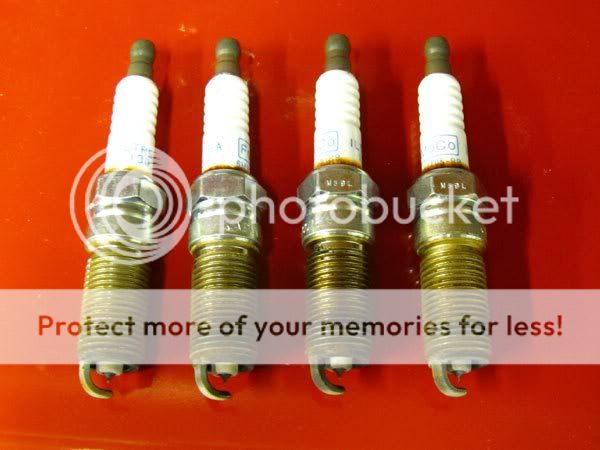
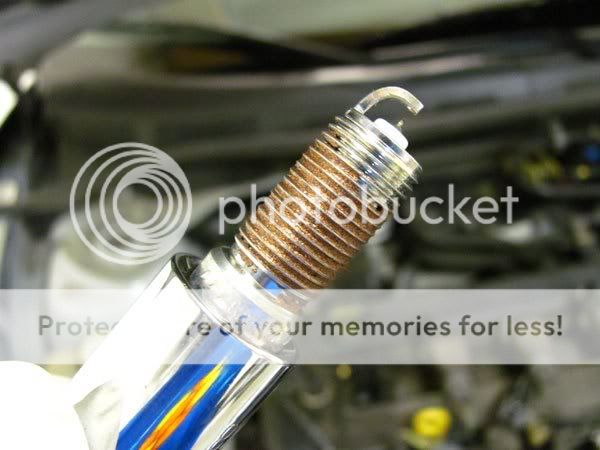
5. Use the 5/8″ spark plug socket, extension and ratchet wrench to remove the old spark plug. The spark plug socket has a rubber grommet in it that will hold onto the spark plug as you remove it, so it won’t fall back in. Here’s what your old spark plugs are likely to look like (these are my factory plugs with about 68k on them):
6. If you’ve decided to use it, apply some anti-seize to the new plug. Be very careful that it gets only on the threads; I used a paper towel to wipe off any excess. Better to use too little than too much, it’s a very bad thing to have anti-seize getting inside the combustion chamber.
7. Put the new plug into the socket, then thread it into the engine. A trick I like to do is to detach the ratchet so it’s just the socket and extension, then start threading the plug couterclockwise a couple turns. This helps make sure the plug gets threaded properly, and not cross-threaded. Then I’ll start screwing it in by hand; it should thread easily and smoothly. If it’s hard to turn, you’re cross-threading it. When you feel some resistance, attach the ratchet and snug the spark plug down. Don’t over-tighten it, since our engines are aluminum and you don’t want to strip the threads.
According to the shop manual, the torque specs for the plugs are 10-14 N·m, or 8-10 lb-ft. (Thanks to XCNuse for this info!)
8. With the new plug in, put the coil pack back on and reinstall the retaining bolt.
9. Do this same process for the remaining 3 spark plugs.
10. Start the engine and make sure everything sounds normal.
11. You’re done! See, that was easy!
thans this is very helpful.
Chris, fantastic!, instructions on spark plug replacement on the mazda3. I just bought my daughter A 2007 mazda3 2.0L with 73,000 miles on it. You made it way easier to change plugs. Thanks a bunch!
Thank you very much for the info! Im going to replace mine this weekend lol
i looked at the engine and was spooked but this should be no problem with your help thanks alot!!
I looked at the engine myself and thought what the world is this i ve never seen the coil on plug desighn thanks
Very clear instructions. Thank you!!
Very professional site friendly user .
Q. Is it the same parts number for for a mazda 3 ,2006 , 2.3L ?
Thanks !